The Complete Guide to Garage conversions in Chicago

Room with exposed wooden ceiling beams and plywood panels, unfinished construction, with a narrow window at the far wall.

The Complete Guide to Garage conversions in Chicago


If you are searching for the best garage remodeling companies in Chicago, you are likely familiar with the recent zoning ordinance updates. If you aren’t, fret not! We’ve got you covered.

Figuring out the zoning and permitting landscape in Chicago has historically been one of the biggest hurdles for homeowners looking to convert a garage. However, the regulatory environment has shifted dramatically. On September 25, 2025, the Chicago City Council voted 46-0 to expand Accessory Dwelling Unit (ADU) access citywide, a landmark decision that officially went into effect on April 1, 2026.

We have found that this citywide expansion means that homeowners across Chicago no longer have to worry about the highly restrictive boundaries of the previous pilot programs. Under the current 2026 rules, coach houses and detached garage conversions are permitted as a matter of right in all RT (Residential Two-Flat, Three-Flat, etc.) and RM (Residential Multi-Unit) zoning districts.

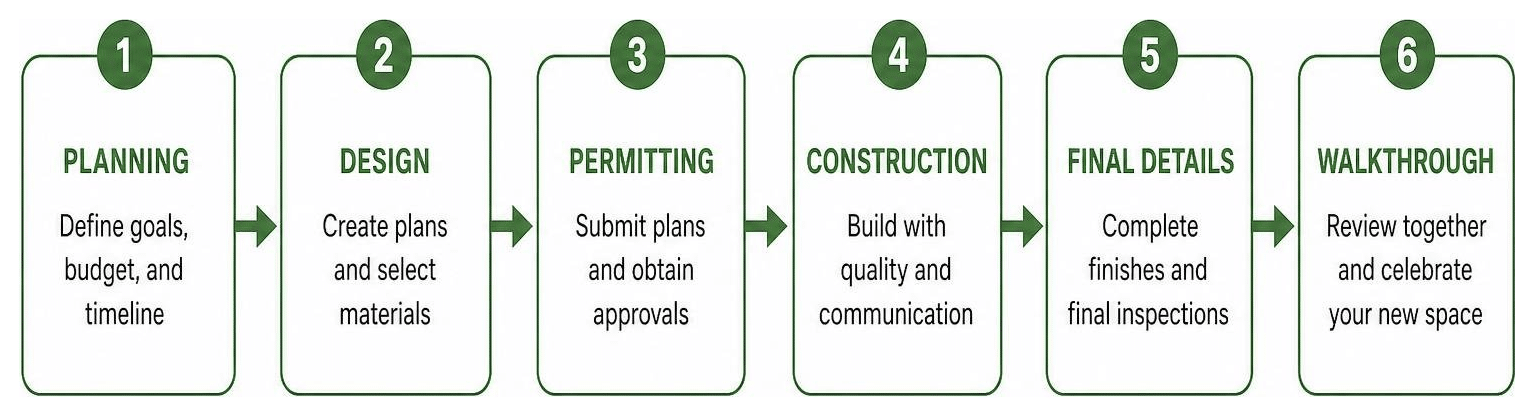
If your property is located in an RS (Residential Single-Unit) zone, you can still pursue a conversion, but these projects are handled through aldermanic opt-ins. This means you will need to coordinate with your local ward office to secure approval, making it highly beneficial to work with an experienced general contractor who understands the local political and regulatory landscape.

Areté has over 20 years of experience transforming homes across the Chicagoland area. Read our reviews to find out why clients consistently refer our services to homeowners in the city and suburbs alike.

Infographic detailing Chicago's 2026 citywide ADU zoning and size limits infographic

When planning your Garage Remodeling project, there are several zoning and construction parameters you must keep in mind:

  • Maximum Size Limits: Detached coach houses are capped at a maximum of 700 square feet of living space. This space must be designed efficiently to meet all habitable room requirements under the Chicago Building Code.
  • No Parking Mandates: One of the most progressive elements of the new ordinance is the complete elimination of additional off-street parking requirements for ADU projects. You do not need to replace the parking space you are losing by converting your garage.
  • Permit Timelines: While standard building permits can sometimes be expedited, the Chicago ADU permit process averages 121 days. This is longer than standard permits because it requires coordinated reviews across multiple city departments, including the Department of Housing and the Department of Water Management.
  • Labor Requirements: To ensure safety and quality, the city instituted new labor requirements starting in April 2026. All contractors working on these conversions must participate in recognized, licensed apprenticeship programs.

Zoning differences in Chicago suburbs

If you live just outside the city limits, the rules change significantly. Suburban municipalities have their own independent zoning boards and building codes that do not follow Chicago’s citywide ADU ordinance.

For example, if you are looking to plan a project in Highland Park or Evanston, you will find that suburban codes often place a heavier emphasis on setbacks, lot coverage ratios, and architectural matching. Evanston has historically been supportive of ADUs but maintains strict height and occupancy limits. Meanwhile, communities along the North Shore may require extensive public hearings or neighborhood notifications before a garage can be converted into a habitable dwelling.

When planning suburban home remodeling projects, we always recommend conducting a thorough feasibility study of your local municipal code. Whether you are planning a project in Irving Park or looking at regional builders across the Chicago area, verifying local setbacks and utility connection rules before drawing up architectural plans is essential.

How Much Does a Garage-to-Living-Space Conversion Cost in Chicago?

A garage conversion is a major financial investment. Because it involves turning a structure built for vehicles into one built for humans, the costs are closer to building a home addition than doing a simple room remodel.

To help you budget, here is a breakdown of the typical costs, timelines, and return on investment (ROI) for different conversion types in the Chicago area in 2026:

Conversion Type Average Cost Range Average Timeline Estimated ROI / Property Value Impact
Basic Flex Space / Rec Room (No plumbing) $60,000-$125,000 2 – 3 Months 50% – 70% ROI
Detached Home Office / Studio (Half bath) $80,000 – $175,000 3 – 4 Months 60% – 80% ROI
Full Coach House / ADU (Full kitchen & bath) $150,000 – $475,000+ 4 – 6 Months 64% average property value increase

For a typical 500-to-700-square-foot detached garage, construction costs generally range from $200 to $400 per square foot. While these upfront numbers can seem daunting, the long-term financial benefits are substantial. On average, Chicago homes with permitted ADUs see property values that are 64% higher than comparable homes in the same neighborhood without accessory units.

For instance, a $200,000 investment in a high-quality coach house can immediately add $150,000 to $250,000 to your overall property value. Furthermore, if you choose to rent out the space, a well-designed ADU in popular neighborhoods can generate between $1,500 and $2,400 per month in passive rental income. To hear a first-hand account of the budgeting and building process, you can watch this video on How I Converted My Garage Into a Room and What It Cost – YouTube .

When planning your budget for your top Chicago home addition projects for 2026, you must also account for several “hidden” costs that are unique to Chicago properties:

  1. Alley Paving Requirements: If your detached garage sits on an unpaved or deteriorated alleyway, the City of Chicago may require you to pay for alley paving as a condition of your permit. This can add an unexpected $5,000 to $15,000 to your project.
  2. Utility Trenching: Bringing water, sewer, and gas lines from the main house to a detached garage requires digging trenches below the city’s 42-inch frost line. This process is labor-intensive and can easily cost $10,000 to $20,000 depending on the distance.
  3. Structural Foundation Upgrades: Most older Chicago garages were built on simple concrete slabs without proper footings. To make the space habitable, or to build a second story, the existing structure often has to be demolished so a proper foundation can be poured.

How Do You Handle HVAC, Plumbing, Insulation, and Design in a Garage Conversion?

Converting a garage requires solving several complex engineering and design challenges. Unlike the main house, a garage is not naturally insulated, lacks climate control, and is highly susceptible to moisture.

Garage conversion under construction showing insulation and framing

To create a space that feels like a natural extension of your home, the exterior design must match the architectural style of the main house. This involves carefully selecting siding materials, roofing colors, and window frames that complement the existing structure.

The goal of a high-end garage remodeling project is to make the building look like it was always meant to be a living space, rather than a modified car shelter.

Insulation and climate control for Chicago winters

Chicago’s extreme weather—with freezing winters and hot, humid summers—demands a robust insulation strategy. To meet local building codes for thermal efficiency, your conversion must achieve minimum insulation values of R-13 for exterior walls and R-30 for ceilings.

To achieve this, we recommend using closed-cell spray foam insulation. Spray foam not only provides a high R-value per inch but also acts as an air and vapor barrier, sealing the drafts common in older garage structures.

Additionally, concrete slab foundations are notorious for holding cold and moisture. To prevent cold floors and drafty rooms, we install a vapor barrier over the concrete, followed by rigid foam board insulation, before laying down the subfloor and final flooring material.

For climate control, mini-split HVAC systems are the gold standard for garage conversions. These ductless systems provide highly efficient, localized heating and cooling. They allow you to control the temperature of the converted space independently from the main house without the massive expense of extending your home’s existing ductwork. You can learn more about our approach to climate-resilient spaces on our Services page.

Plumbing and electrical integration

Integrating utilities is often the most technically demanding phase of a conversion. For electrical, a standard garage usually runs on a single 15-amp or 20-amp circuit—barely enough to power a few lightbulbs and a garage door opener. A fully functional living space, especially one with a kitchen or bathroom, will require a dedicated subpanel (typically 60 to 100 amps) connected directly to your home’s main electrical service.

Plumbing presents its own set of challenges. Detached structures require water and sewer lines to be trenched deep underground to prevent freezing. To keep costs manageable, we look for opportunities to align the new plumbing lines with existing wet walls in the main house.

If you are looking for inspiration on how to layout these mechanical systems efficiently, check out our guide on the 3 Best Garage Rebuilding Ideas for Your New Home.

When space is at a premium in dense Chicago neighborhoods like Lakeshore East, Irving Park, or Evanston, converting a garage is one of the smartest ways to maximize your property’s footprint.

Multi-functional garage conversion used as a home office and guest suite

Because a standard garage footprint is relatively compact, smart space-saving design features are essential. We frequently design these spaces with:

  • Lofted Sleeping Areas: Utilizing vertical space to keep the ground floor open.
  • Built-In Storage: Custom cabinetry and hidden closets built into knee walls.
  • Open Floor Plans: Minimizing interior walls to make 500 square feet feel like 800.
  • Flexible Entrances: Using carriage-style doors or large sliding glass panels to create an indoor-outdoor living flow during the summer months.

If you are exploring different layout options, our section on Home Additions offers excellent inspiration for expanding your living area.

Accessory Dwelling Units (ADUs) and coach houses

The most popular use for a garage conversion in 2026 is a fully independent Accessory Dwelling Unit (ADU). These self-contained units feature their own kitchen, bathroom, sleeping area, and private entrance.

ADUs are highly sought after because they can serve as a steady source of rental income, helping to offset your mortgage payments. They are also ideal for multi-generational living, giving adult children or aging parents a private, independent space close to family.

For more localized design concepts, explore our Chicago Home Addition Ideas for Your Space.

Home offices, guest suites, and flex spaces

If you do not need a full rental unit, converting your garage into a dedicated home office or guest suite is an excellent alternative. A detached workspace provides a quiet, professional environment away from the distractions of the main house—a critical benefit for remote professionals.

Alternatively, a comfortable guest suite with a half-bath and a wet bar provides a welcoming retreat for out-of-town visitors. To learn more about the step-by-step planning process for these projects, read through A Contractor’s Guide to Home Additions.

How Do You Choose the Best Garage Remodeling Contractor in Chicago?

A garage-to-living-space conversion is a highly regulated, structurally complex project. It is not a job for a basic handyman or an unlicensed contractor. To protect your investment, you need to partner with an experienced, fully licensed, and insured general contractor.

Newly remodeled ADU Coachhouse addition by Areté Renovators in Chicago.

When vetting potential contractors for your Home Remodeling project, always ask for the following qualifications:

  • A Valid Chicago General Contractor License: Verify their license number directly on the City of Chicago’s Department of Buildings portal.
  • Substantial Liability and Workers’ Comp Insurance: This protects you from financial liability in the event of an onsite accident.
  • A Strong Portfolio of Permitted Work: Ask to see examples of completed garage conversions or structural additions within your specific municipality.
  • Familiarity with the 2026 ADU Labor Laws: Ensure they comply with the city’s new apprenticeship requirements.

Be wary of red flags, such as a contractor who asks you to pull the building permits yourself, or one whose bid is significantly lower than all other estimates. A low bid often indicates that the contractor has overlooked critical requirements like frost footings, proper insulation, or utility trenching.

Additionally, ask about their financing and payment structures. Reputable firms will offer clear, milestone-based payment schedules. You can explore our full range of design and construction solutions on our Services page.

The Areté Renovators Difference

At Areté Renovators, we understand that undertaking a major structural renovation can feel overwhelming. That is why we have built our business around a highly structured, client-focused process designed to deliver complete peace of mind.

When you partner with us, you are assigned a dedicated project coordinator who serves as your single point of contact. Your coordinator manages every phase of the project, including:

  • Architectural Design & Space Planning: Creating a beautiful, functional layout that maximizes your garage’s footprint.
  • Zoning and Permit Coordination: Handling all the paperwork and back-and-forth communication with the Chicago Department of Buildings to secure your permits as quickly as possible.
  • Construction Management: Coordinating our skilled, licensed trade professionals to keep your project on schedule.
  • Daily Updates: Keeping you fully informed with daily progress reports, photos, and clear timelines through our client portal, from the first day of demolition to the final walkthrough.

What Are the Most Common Questions About Chicago Garage Conversions?

Do I need a permit to convert my garage in Chicago?

Yes, any project that converts a non-habitable structure (like a garage) into a habitable living space absolutely requires a building permit from the City of Chicago. Standard structural permits typically take 8 to 12 weeks to process. However, if you are building an ADU or coach house, the review process averages 121 days due to the additional departmental reviews required to verify zoning, housing, and water management compliance.

Can I convert my existing garage structure, or do I need to rebuild?

In most cases, older Chicago garages cannot be converted directly. Most existing garages were built on thin concrete slabs without the 42-inch frost footings required by modern building codes for habitable structures.

Additionally, the existing framing and roof trusses are rarely strong enough to support drywall, insulation, and modern mechanical systems. A partial or full demolition and rebuild is usually the most cost-effective and structurally sound way to ensure your new living space is safe, durable, and fully compliant with city codes.

How much rental income can a Chicago ADU generate?

Rental income depends heavily on your specific neighborhood and the quality of the finishes. In highly desirable areas like Logan Square, Lincoln Park, Avondale, and Evanston, a well-designed, one-bedroom coach house can easily generate between $1,500 and $2,400 per month. Units with premium finishes, separate utility meters, and private outdoor spaces command the highest rents.

Ready to Transform Your Chicago Garage into a Functional Living Space?

Converting an underutilized garage into a beautiful, functional living space is one of the most rewarding home improvement projects you can undertake in 2026. Whether you want to build a modern coach house to generate passive rental income, create a quiet detached home office, or design a private guest suite for multi-generational living, the investment adds massive long-term equity and flexibility to your property.

However, success relies on navigating Chicago’s strict building codes, complex zoning laws, and challenging winter climate. Partnering with an experienced, local general contractor is the best way to ensure your project is completed safely, legally, and to the highest standards of craftsmanship.

At Areté Renovators, we are proud to serve homeowners across Chicago, Evanston, Highland Park, Lakeshore East, and Irving Park. We are ready to help you bring your vision to life with our seamless, design-build process.

Call us at 773.683.3033 or contact us today to schedule your personalized design consultation and take the first step toward your custom Garage Remodeling project.

Don’t Let June Showers Ruin Your Brickwork: Chicago Spring Tuckpointing Guide

Under-construction apartment building with exposed brick walls and workers on scaffolding across a concrete frame.

Don’t Let June Showers Ruin Your Brickwork: Chicago Spring Tuckpointing Guide

What Chicago Homeowners Need to Know About Tuckpointing Chicago Spring Projects


If you’re planning tuckpointing Chicago spring projects, here’s what matters most right now:

  • Best time to start: April through early June, when temps stay reliably above 40°F
  • Why spring: Mortar needs mild, stable conditions to cure correctly — winter and summer both cause problems
  • Average cost: $9–$25 per square foot, depending on project size and building access
  • How long it lasts: 20–40 years when done correctly with the right mortar
  • Top warning signs: Crumbling mortar, white chalky staining, spalling brick faces, water leaking inside
  • Book early: Spring is the busiest season for Chicago masonry contractors — schedules fill fast

If you own a brick home or building in Chicago, winter doesn’t just pass — it quietly damages your masonry every single year.

Chicago endures more than 60 freeze-thaw cycles annually, one of the harshest rates in the country. Each cycle works the same way: moisture seeps into small gaps in your mortar joints, freezes, expands, and widens those gaps a little more. By the time spring arrives, what looked like a minor crack in October can be a crumbling joint, a spalling brick face, or worse — water finding its way inside your walls.

The frustrating part? Most of the damage is invisible until spring thaw exposes it.

That’s why spring is the critical window for Chicago property owners. It’s the moment when winter damage becomes visible and temperatures finally become stable enough to make proper repairs. Mortar cannot bond or cure correctly below 40°F — so every week of cold weather is a week repairs can’t happen. And once summer heat and contractor backlogs hit, your options narrow fast.

We are here to walk you through everything you need to plan your spring tuckpointing project: why timing matters, how to spot damage, what it costs, which mortar is right for your building, and how to find a contractor you can trust.

Freeze-thaw cycle showing water entering mortar joints, freezing, expanding, and cracking masonry over winter infographic

Tuckpointing chicago spring projects terms you need:

Why Spring is the Prime Season for Tuckpointing Chicago Spring Projects

mason applying fresh mortar in mild spring weather

When we plan masonry repairs in regions like Irving Park IL, Evanston IL, or Lakeshore East IL, we must respect the chemical nature of mortar. It is not simply “mud” that dries in the sun; it is a cementitious or lime-based mixture that requires a precise chemical curing process.

For mortar to cure correctly and achieve its intended compressive strength, it requires moderate temperatures and stable humidity. Specifically, the temperature must remain consistently above 40°F for at least 48 hours after application. If the temperature drops below freezing, the water inside the wet mortar will freeze, expand, and destroy the crystalline structure of the curing paste before it can bond with the brick. This results in weak, powdery joints that will fail within a single season.

Conversely, the intense heat and direct sunlight of July and August present the opposite problem. High temperatures evaporate the moisture in the mortar mix too quickly, a process known as rapid drying. Without sufficient water to finish the hydration process, the mortar shrinks, cracks, and fails to adhere to the brick faces.

Spring provides the perfect “Goldilocks” zone. The mild temperatures (typically between 50°F and 70°F) and natural spring humidity allow the fresh mortar to cure slowly and thoroughly, creating a weather-tight bond that can withstand decades of Lake Michigan wind and rain. Taking the time to prepare your home now ensures your exterior envelope is sealed before the heavy summer storms roll in. For more spring prep advice, check out our guide on 10 Ways to Prep Your Home for a Fruitful Chicago Spring.

Reversing Winter Freeze-Thaw Damage on Chicago Masonry

Chicago’s lake-effect winters are legendary, but their impact on masonry is often underestimated. As moisture from snow and freezing rain settles into porous mortar joints, it undergoes a destructive transformation. Water expands by approximately 9% when it freezes, exerting thousands of pounds of pressure per square inch inside the brickwork.

When this cycle repeats over 60 times in a single winter, the physical stress is immense. The mortar joints begin to micro-fracture, lose their adhesion, and crumble away. This exposes the soft interior of the brick to direct water penetration. Once water enters the brick itself and freezes, it causes “spalling” — a severe condition where the outer face of the brick literally pops off, leaving a crumbling, raw core exposed.

Addressing this damage in the spring is essential to stop the deterioration process before it compromises the structural integrity of your walls. To understand how to protect your home before the cold weather returns, read about Winter is Coming: Here Are the Steps You Should Take to Winterize Your Chicago Home.

Beating the Summer Rush for Tuckpointing Chicago Spring Projects

Spring is the busiest season of the year for qualified masonry contractors across Chicagoland. Property owners who wait until June or July to request estimates often find themselves facing weeks-long waitlists and peak-season pricing.

By initiating your tuckpointing Chicago spring projects early in the season — ideally starting your planning and inspections in late winter or early spring — you can secure a spot on the schedule before the summer rush. Proactive planning is the key to cost-effective home maintenance. You can learn more about coordinating these early steps by reading our advice on how to Start Planning Your Chicago Spring Remodel This Winter.

How to Identify Winter Masonry Damage on Your Chicago Property

crumbling mortar joints and efflorescence on chicago brick wall

Identifying winter masonry damage requires a careful, methodical walk around your property. It is best to perform this inspection on a dry spring afternoon when the angle of the sun can highlight shadows cast by receding joints or bulging walls.

A simple, highly effective method for testing your mortar is the “screwdriver test.” Take a flathead screwdriver and gently scrape it along a few suspect mortar joints. If the mortar easily crumbles into a fine, sandy powder, or if the screwdriver sinks deep into the joint with minimal pressure, the mortar has lost its structural integrity and must be replaced.

To dive deeper into the technical details of this process, consult The Complete Guide to Masonry Tuckpointing Chicago.

Key Warning Signs Your Building Needs Tuckpointing Chicago Spring Projects

Keep a close eye out for these six common indicators of masonry distress:

  1. Cracked or Receding Mortar Joints: Look for hairline fractures running along the joints or areas where the mortar has eroded back more than 1/4 inch from the face of the brick.
  2. Powdery Mortar: If the mortar crumbles at a light touch, it has failed chemically and is no longer supporting the masonry units.
  3. Efflorescence: This is a white, powdery, or crystalline salt residue left on the surface of the brick. It occurs when water penetrates the masonry, dissolves internal salts, and carries them to the surface as it evaporates. It is a clear warning sign of active water migration.
  4. Stair-Step Cracking: Cracks that follow the mortar joints in a diagonal, stair-step pattern often indicate structural settlement or localized movement in the wall system.
  5. Spalling Brick: If you notice brick faces chipping, flaking, or falling onto the ground below, water has penetrated the brick body and frozen, blowing the face off.
  6. Rusted Steel Lintels: The steel beams supporting the brickwork above your windows and doors (lintels) will rust if exposed to moisture. As steel rusts, it can expand up to 10 times its original thickness. This phenomenon, known as “rust-jacking,” lifts the masonry above it, causing severe cracking and structural displacement.

The Difference Between Tuckpointing and Full Masonry Restoration

It is important to distinguish between routine maintenance and major structural repair:

  • Tuckpointing (or Repointing): This is the process of grinding out deteriorated mortar joints to a depth of at least 3/4 inch and packing in fresh, color-matched mortar. It is appropriate when the bricks themselves are physically sound and the structural stability of the wall is intact.
  • Full Masonry Restoration: This larger-scale process is required when the building’s structural integrity is compromised. It involves replacing cracked or spalled bricks, rebuilding bowed or leaning sections of the wall, replacing rusted structural steel lintels, and resolving active foundation settlement issues.

Diagram showing the difference between simple tuckpointing and full masonry restoration

The Cost of Tuckpointing in Chicago: Budgeting and Factors

Budgeting for tuckpointing Chicago spring projects requires an understanding of how local contractors price their work. In the Chicago market, tuckpointing typically ranges from $9 to $25 per square foot.

For a minor, localized repair on a residential property, costs might start around $1,000. However, a full facade tuckpointing project on a multi-story home or a classic Chicago three-flat can easily range into the tens of thousands of dollars.

Several key factors influence where your project will fall on this spectrum:

  • Project Size: Larger surface areas naturally require more materials and labor, though the cost per square foot may decrease slightly on large, continuous walls.
  • Accessibility and Height: Working on a single-story ranch home is far simpler than working on a three-story brownstone in Lakeshore East IL. If the project requires scaffolding, swing stages, or sidewalk canopy protection, the equipment and labor costs will rise.
  • Scaffolding Permits: The City of Chicago requires specific permits for any scaffolding erected over public right-of-ways (like sidewalks or alleys). Managing these municipal requirements is a crucial part of the planning process.
  • Condition of the Existing Masonry: If the mortar is exceptionally hard (such as previous incorrect repairs using modern cement) or if numerous bricks must be replaced, the preparation work will take significantly longer, increasing labor costs.

To help you estimate your potential investment, here is a general breakdown of typical costs in the Chicago area:

Project Scale / Building Type Average Square Footage Estimated Cost Range Key Considerations
Small Localized Repair (e.g., Chimney or entry stairs) Under 100 sq. ft. $1,000 – $2,500 Simple access, quick setup, minimal permitting.
Standard Residential Facade (e.g., Front of a bungalow) 300 – 600 sq. ft. $3,500 – $9,000 Ground-level or basic scaffolding; color-matching is critical.
Two-Story Single Family Home (Full exterior) 1,500 – 2,500 sq. ft. $15,000 – $35,000 Height access required; potential brick matching for chimneys.
Classic Chicago Three-Flat (Side or rear walls) 3,000+ sq. ft. $27,000 – $60,000+ Scaffolding permits, historic mortar matches, structural lintel repairs.

For a detailed look at how to navigate these estimates and find the right professional, read Don’t Let Your Bricks Crumble: A Guide to Tuckpointing Contractors in Chicago.

Understanding Mortar Types: Historic Lime vs. Modern Portland Cement

Getting the mortar mix right is the single most important factor in the longevity of any masonry project, particularly for historic properties built before 1960.

Older Chicago buildings — such as the historic 1916 Brick Foursquare homes found in older neighborhoods, or vintage bungalows in Irving Park IL — were constructed using soft, porous “Chicago common” bricks. These historic bricks were laid using lime-based mortars (such as Type O mortar, which has a low compressive strength of around 350 PSI). Lime mortar is highly breathable and flexible, allowing the wall to expand, contract, and shed moisture naturally.

Modern construction, however, relies on Portland cement-based mortars (such as Type S or Type N mortar), which are incredibly hard, dense, and impermeable.

If a contractor mistakenly uses a hard Portland cement mortar to tuckpoint a historic soft-brick building, it will cause catastrophic damage. Because the modern mortar is harder than the old brick, any natural thermal expansion or structural settling will concentrate stress directly into the historic brick faces instead of the mortar joints. This causes the brick faces to crack, shear, and spall off.

Always ensure your contractor performs a mortar analysis to match both the color and the physical hardness of your building’s original materials.

Maximizing Longevity: Combining Tuckpointing with Waterproofing

Once your tuckpointing repairs are complete, the next logical step is protecting that investment. Applying a professional-grade waterproof sealer can significantly extend the lifespan of your new masonry. However, you must use the correct product.

Never use non-breathable, film-forming sealers (like acrylics or urethanes) on exterior brick walls. These products create a solid plastic barrier on the surface of the brick. While they successfully keep rain out, they also trap moisture migrating from the interior of the home inside the wall. When winter arrives, this trapped water freezes directly behind the sealer, causing widespread spalling of the brick faces.

Instead, we recommend using highly breathable, penetrating sealers formulated with Silane or Siloxane. These sealers penetrate deep into the pores of the brick and mortar, chemically bonding with the silica to repel liquid water from the outside while allowing water vapor to escape from the inside. To learn more about preparing your home’s exterior envelope for seasonal weather changes, explore Prepping Your Chicago Home for the Cold with the 5 Ps.

How Long Does a Professional Tuckpointing Job Last?

A professionally executed tuckpointing job using compatible, high-quality materials should last 20 to 30 years on a standard Chicago building, and up to 40 years on historic properties when maintained correctly.

To maximize this lifespan, we advise property owners to adopt a 5-to-7-year maintenance cycle. Having a professional perform a quick visual inspection every few years allows you to catch and repair minor joint failures before they escalate into large-scale, costly projects. Proactive maintenance is always the most cost-effective way to preserve your building’s structural integrity and curb appeal.

Frequently Asked Questions About Chicago Tuckpointing

Can tuckpointing fix active interior water leaks?

Tuckpointing is highly effective at stopping water leaks, but only if the failing mortar joints are the actual pathway the water is taking.

If your interior water stains are caused by torn roof flashing, a cracked chimney crown, failed window caulking, or a compromised flashing system behind the brick, tuckpointing alone will not solve the problem. A comprehensive evaluation must be performed to diagnose the true root cause of the leak before executing repairs.

Do I need a permit for tuckpointing in Chicago?

In most cases, minor, localized tuckpointing at ground level does not require a building permit from the City of Chicago.

However, if your project requires scaffolding or swing stages that hang over public property (such as a sidewalk or alley), you must obtain a scaffolding permit and potentially a public right-of-way use permit. Additionally, if you own a property in a designated Chicago Landmark district, any exterior work must be reviewed and approved by the Commission on Chicago Landmarks to ensure historic preservation standards are met.

How do I choose a reliable tuckpointing contractor in Chicago?

To protect your home and your investment, always look for the following qualifications when hiring a contractor:

  • Proper Licensing and Insurance: Verify they hold a active Chicago supervising mason license, general liability insurance, and worker’s compensation coverage.
  • In-House Crews: Ask if the company uses their own experienced, in-house masonry crews or if they subcontract the work to third-party sales companies, which can lead to inconsistent quality.
  • Detailed Written Estimates: A professional quote should clearly outline the scope of work, the depth to which old mortar will be ground out (minimum 3/4 inch), the specific mortar types to be used, and the cleanup process.

For more expert advice on managing exterior remodeling projects in the Chicago area, read our Chicago Exterior Remodeling Q&A with Arete Renovators.

Your Chicago Exterior Remodeling Experts

Your building’s brickwork is its first line of defense against Chicago’s demanding climate. Taking a proactive approach to tuckpointing Chicago spring projects is the best way to reverse winter damage, protect your property from water intrusion, and preserve its structural integrity for decades to come.

At Areté Renovators, we serve homeowners and property owners across Chicago IL, Evanston IL, Highland Park IL, Lakeshore East IL, and Irving Park IL. As a premier general contractor, we pride ourselves on our highly structured, client-focused process.

From your initial design consultation through the final walkthrough, we streamline your project by providing daily updates and assigning a dedicated project coordinator to manage every detail — including design, permitting, and construction. Whether you are planning a historic restoration or a modern home renovation, we are here to deliver exceptional results.

Ready to protect and restore your brickwork this season? Give us a call at 773.683.3033 to schedule your spring consultation with Areté Renovators.

How to Find the Best Roofing Source in Chicago IL Without Losing Your Mind

White flat rooftop with a large tree overhanging from the edge and a clear blue sky above; a small vent pipe sits on the roof surface.

How to Find the Best Roofing Source in Chicago IL Without Losing Your Mind

Why Getting Chicago IL Roofing Right Is More Important Than You Think

Chicago IL, roofing is one of the most demanding home improvement decisions you’ll face as a property owner in the region — and getting it wrong is a nightmare.

Here’s a quick snapshot to help you orient fast:

What You Need to Know The Short Answer
Most common material Asphalt shingles (15-20 year lifespan in Chicago)
Average replacement cost $8,000 – $40,000+ depending on size and material
Typical project timeline 1 to 3 days for most residential replacements
Permit required? Yes, for all replacements and repairs over 25% of roof area
Contractor must-haves Illinois roofing license, liability insurance, workmanship warranty
Biggest local threats Ice dams, freeze-thaw cycles, hail, and high winds

Chicago averages 38 inches of snowfall per year. Add dramatic temperature swings, high winds, and hail seasons, and your roof takes a serious beating. Over 70% of Chicago homeowners report weather-related roof damage at some point.

The result? A lot of stressed homeowners trying to sort through dozens of contractors, confusing permit rules, and wildly different quotes — all while worrying whether their ceiling is about to leak.

We are here to help you cut through the noise. Whether you’re dealing with storm damage, planning a full replacement, or just trying to understand what questions to ask a contractor, you’ll find clear, practical answers here.

Chicago roofing materials, costs, permits, and contractor checklist infographic infographic

Understanding Chicago, IL Roofing Systems and Materials

Choosing the right roofing material in Chicago is not just about curb appeal. It is a critical decision that dictates how well your property survives the brutal Midwestern climate. From the historic brick bungalows of Irving Park to the luxury high-rises flanking Lakeshore East, different architectural styles require vastly different roofing systems.

When planning an Exterior Remodeling project, understanding the core characteristics of popular local materials is the first step to making an informed investment.

Let’s look at how the primary roofing materials stack up in the Chicago area:

Material Ideal Slope Lifespan in Chicago Pros Cons
Asphalt Shingles Steep slope 15–20 Years Affordable, highly customizable, easy to spot-repair Vulnerable to high winds and thermal shock
TPO (Thermoplastic Polyolefin) Low slope / Flat 15–25 Years Highly reflective, lowers energy bills, heat-welded seams Requires professional installation, sensitive to pooling water
EPDM (Rubber) Low slope / Flat 20–30 Years Extremely durable, handles thermal expansion well Absorbs heat (black color), seams can degrade over time
Modified Bitumen Low slope / Flat 15–20 Years Proven multi-layer protection, highly puncture-resistant Installation involves open torches (safety hazard)
Metal Roofing Low / Steep slope 40–70 Years Practically indestructible, sheds snow quickly High upfront cost, can be noisy during hail storms

Residential Chicago, IL Roofing Options

For single-family homes, townhouses, and multi-unit residential buildings throughout Chicagoland, steep-slope roofing systems dominate. Choosing the right material directly impacts your home’s thermal envelope and long-term resale value.

  • Asphalt Shingles: The undisputed king of residential roofing. Standard 3-tab shingles are cost-effective, but architectural shingles are the preferred choice for modern upgrades. They provide a thicker, dimensional appearance that mimics wood shake or slate while offering superior wind resistance.
  • Slate and Clay Tile: Frequently seen on historic homes in Evanston and Highland Park. These materials are incredibly beautiful and can easily last over a century. However, they are heavy, requiring structural framing assessments, and require specialized artisans to install and repair safely.
  • Wood Shake: Offers a rustic, high-end aesthetic. While beautiful, wood shakes require meticulous maintenance to prevent rot and mold growth in Chicago’s humid summers.

If you are looking to maximize your property’s market appeal, coordinate your roof replacement with other high-impact updates. Check out our guide on the Top 2026 Exterior Upgrades for Chicago Homes to see how modern roofing pairs with premium siding and masonry.

Commercial Chicago IL Roofing Solutions

Flat and low-slope roofing systems are the norm for commercial buildings, industrial warehouses, and traditional Chicago three-flats. These roofs face unique challenges, primarily standing water and UV degradation.

  • TPO (Thermoplastic Polyolefin): TPO is a single-ply white membrane that has exploded in popularity. Because it is highly reflective, it prevents the “urban heat island” effect. Commercial property owners often see their cooling costs drop by up to 25% after switching to TPO.
  • EPDM (Ethylene Propylene Diene Monomer): EPDM is a synthetic rubber membrane. It is incredibly tough and behaves like an inner tube, expanding and contracting as Chicago’s temperature swings from sub-zero winters to scorching summer days.
  • Modified Bitumen: A modern evolution of built-up roofing (BUR). It utilizes asphalt combined with polymerized plastic or rubber, reinforced with fiberglass or polyester. It is typically installed in multiple layers, making it exceptionally resistant to punctures and foot traffic.
  • Roof Coatings: For commercial roofs that are structurally sound but nearing the end of their lifespan, elastomeric or silicone roof coatings can extend performance by 10 to 15 years at a fraction of the cost of a full tear-off.

Chicago Weather Impacts, Building Codes, and Costs

Our local weather is notoriously volatile. A single year in Chicago can deliver sub-zero blizzards, torrential spring rains, golf-ball-sized summer hail, and powerful autumn windstorms. This section breaks down how this climate impacts your roof, how local building codes regulate repairs, and what you should expect to pay.

The Impact of Chicago Weather on Roof Performance

Chicago’s climate forces roofing materials to expand and contract rapidly, a phenomenon known as thermal shock. Over time, this movement weakens shingle adhesives, cracks flashing, and causes sealants to fail prematurely.

The winter months present the greatest threat in the form of ice dams. When heat escapes from your living space into the attic, it warms the roof deck, melting the bottom layer of snow. This water runs down the slope until it reaches the cold, uninsulated eaves, where it refreezes. This cycle creates a solid block of ice that traps subsequent meltwater, forcing it backward under the shingles and directly into your ceiling and walls.

To prevent this, Chicago building codes enforce strict ventilation and attic insulation standards. Ensuring your attic meets R-38 insulation standards (and ideally R-49) keeps your roof deck cold, preventing ice dams and condensation from rotting your structural roof deck from the inside out.

The Express Permit Program and Code Compliance

The City of Chicago Department of Buildings strictly regulates all roofing activities to ensure structural safety and energy efficiency.

  • The 25% Repair Rule: If you are repairing less than 25% of your total roof area, you generally do not need a building permit. However, if repairs exceed 25%, or if you are doing a full replacement, a permit is mandatory.
  • The Express Permit Program (EPP): For straightforward reroofing projects that do not involve structural changes, contractors can obtain permits rapidly through this streamlined program.
  • Roof Recover vs. Tear-Off: Chicago building code allows a maximum of two roofing layers. If your home currently has only one layer of shingles, you may legally “recover” it by installing a second layer directly over the first. However, if you already have two layers, a complete tear-off down to the bare wooden deck is required.
  • Structural Calculations: If you are installing heavy materials, like slate or clay tile, or adding structural dormers, you must hire a licensed structural engineer or architect to submit official load calculations before a permit is issued.

Average Costs and Timelines for Roof Replacement

For a standard residential home in Chicago, a professional roof replacement typically costs anywhere from $8,000 – $40,000+.

Your final price will vary based on several factors:

  • Roof Size and Pitch: Steeper roofs require specialized safety equipment and more labor, raising the overall cost.
  • Material Selection: Upgrading from standard architectural shingles to metal, slate, or premium composite materials will increase the material budget.
  • Structural Wood Replacement: If water has rotted your underlying plywood deck, replacing these sheets will add to the final invoice.

Fortunately, the actual construction timeline is surprisingly short. A professional crew can complete a standard residential roof replacement in 1 to 3 days, minimizing disruption to your daily routine.

How to Choose a Reliable Chicago Roofing Contractor

With over 5,000 registered contractors serving the Chicagoland area, finding a trustworthy partner can feel overwhelming. Choosing the wrong contractor can lead to cut corners, code violations, and structural water damage that won’t show up until the next heavy storm.

A professional roofing crew installing shingles

Licensing, Bonding, and Insurance Requirements

Never hire a contractor who cannot immediately produce proof of the following credentials:

  • Illinois State Roofing License: In Illinois, all roofing contractors must be licensed by the Illinois Department of Financial and Professional Regulation (IDFPR). This license proves they have passed rigorous safety and competency exams.
  • General Contractor License: Municipalities like Chicago and Evanston require a local general contractor license to pull permits.
  • General Liability Insurance: This protects your property if a heavy bundle of shingles crashes through a window or a sudden downpour floods your home mid-project.
  • Worker’s Compensation Insurance: Roofing is hazardous work. If a laborer is injured on your property and the contractor lacks worker’s comp, you could be held legally liable for medical expenses.

Before signing a contract, verify their standing on local business directories and municipal license lookups. Trusted local providers maintain clear, verifiable records of their licensing and insurance coverage.

Warranties and Maintenance Programs

A great roof is only as good as the warranty backing it. When evaluating quotes, look for two distinct types of coverage:

  • Manufacturer Warranties: These cover defects in the roofing materials themselves (typically ranging from 20 to 50 years). Premium certifications, such as GAF Master Elite or Owens Corning Preferred Contractor status, allow select roofers to offer extended system warranties that cover both materials and labor.
  • Workmanship Warranties: Offered directly by the contractor, this covers installation errors. A reputable contractor should offer at least a 5-to-10-year workmanship warranty.

To preserve these warranties, establish a preventative maintenance routine. Keep your gutters clear of debris to prevent water from backing up under your shingles. If you are planning broader home upgrades, pairing your roof maintenance with high-quality siding is a smart move. Read our guide on Tips on Choosing the Best Siding for Your Home to learn how these two systems work together to seal your home’s exterior.

Frequently Asked Questions About Chicago Roofing

How do I know if my Chicago roof has storm damage?

Look for obvious signs from the ground: missing, curled, or cracked shingles, exposed roofing felt, or dented metal flashing. Indoors, check your attic and top-floor ceilings for water stains or peeling paint. If Chicago has recently experienced a major hail storm, look for dark, circular impact marks on your shingles or heavy accumulations of mineral granules in your gutters. If you suspect damage, schedule a professional inspection promptly to document the issues for your insurance claim.

Can I recover my roof instead of doing a full tear-off?

Under Chicago building codes, you can install a second layer of shingles over an existing single layer, provided the roof deck is structurally sound and free of rot. However, a full tear-off is almost always the superior choice. A tear-off allows us to inspect the wooden deck for hidden rot, install modern ice and water shields along the eaves, and ensure your new manufacturer warranty is fully valid.

How does attic insulation affect my roof’s lifespan?

Attic insulation is vital to your roof’s longevity. Proper insulation (meeting R-38 standards) combined with active ventilation keeps your roof deck at a uniform temperature. This prevents ice dams in the winter and keeps your attic from turning into an oven in the summer, which can literally bake your shingles and cause them to blister, crack, and fail prematurely.

Your Premier Chicago Roofing Contractors

Learning the ins and outs of Chicago, IL roofing replacements doesn’t have to be a stressful ordeal. By understanding local materials, preparing for our unique weather challenges, and verifying contractor credentials, you can protect your home and make a smart investment.

At Areté Renovators, we believe your exterior remodeling journey should be entirely seamless. As a premier Chicago-based general contractor, we specialize in high-end residential remodeling and renovations across Chicago, Evanston, and Highland Park.

Our unique design-build process takes the headache out of home remodeling. From initial material selection through final municipal inspections, you will work with a dedicated project coordinator who provides daily updates on your project’s progress. We manage every detail so you can enjoy peace of mind, knowing your home is protected by the best craftsmanship in the business.

Ready to elevate your home’s protection and curb appeal? Explore our Areté Renovators Roofing Services by contacting us today, or give us a call at 773.683.3033 to schedule your personalized exterior consultation.

A Comprehensive Guide to Window Replacement Chicago

Two tall city buildings seen from street level against a blue sky with clouds.

A Comprehensive Guide to Window Replacement Chicago

Why Window Replacement in Chicago Is One of the Smartest Home Upgrades You Can Make

Planning window replacement in Chicago? Here’s what you need to know upfront:

Quick answers for Chicago homeowners:

  • Average cost: $250–$1,200 per window (average \~$600)
  • Best materials for Chicago: Vinyl or fiberglass — both handle freeze-thaw cycles well
  • Annual energy savings: Up to $298/year by switching to energy-efficient windows
  • Permit required? Yes, in most cases — Chicago’s Express Permit Program covers buildings up to 7 stories
  • Historic home? Greystones and Victorians have extra rules — Landmark Commission approval may be required
  • Installation time: \~30 minutes per window; most whole-home projects finish in 1–2 days

Chicago winters are brutal. Summers are humid and hot. And if your windows are old or drafty, your home is likely hemorrhaging energy — and money.

According to the U.S. Department of Energy, drafty windows can cut your home’s energy efficiency by up to 30%. For Chicago homeowners, that translates to nearly $298 wasted every year on heating and cooling costs that simply escape through the glass.

But window replacement isn’t just about energy bills. New windows can transform the look of your home, reduce outside noise, improve security, and add real resale value — all at once.

The challenge? Chicago’s extreme climate, dense mix of architectural styles (bungalows, greystones, two-flats, Victorians), and city permit requirements make window replacement more complex here than in most cities. There’s a lot to get right.

We’ll guide you through costs, materials, permits, historic home rules, and the contractor questions we’ve seen matter most on real Chicago window replacement projects.

A beautiful window replacement in a Downtown Chicago high-rise.

The Real Cost of Window Replacement Chicago

Let’s talk numbers. When budgeting for window replacement in Chicago, it is important to understand that costs vary widely depending on the material, style, size, and the complexity of the installation.

Window installation in Chicago's Andersonville neighborhood.

On average, a single replacement window installation in Chicago ranges from $250 to $1,200, with the overall average sitting at approximately $600 per window. If you are doing a standard double-hung vinyl insert, you can expect to pay on the lower end of that spectrum. However, if you are looking to replace historic wood windows on a classic Chicago greystone, the price can climb significantly.

Upgrading your windows is one of the Top 2026 Exterior Upgrades for Chicago Homes because it offers an incredible return on investment. Not only does it instantly elevate your curb appeal, but it also directly slashes your monthly operating costs.

Cost Breakdown by Material

The material you choose is the single biggest factor in your overall project cost. Here is what you can expect to pay in the Chicago market in July 2026:

Window Material Average Cost per Window Expected Lifespan Best For
Vinyl $300 – $800 20 – 30 Years Budget-friendly, low-maintenance, excellent insulation
Aluminum $400 – $1,200 20 – 25 Years Modern townhomes, slim profiles, lightweight strength
Fiberglass $500 – $1,500 30 – 40 Years Extreme durability, zero warping, high-end efficiency
Wood $800 – $2,000+ 30 – 50+ Years (with care) Historic homes, classic aesthetics, natural insulation
  • Vinyl Windows: Highly affordable and virtually maintenance-free. First-generation, virgin vinyl is structurally superior to recycled vinyl and holds its seal incredibly well during our crazy Midwest freeze-thaw cycles.
  • Fiberglass Windows: Stronger than vinyl and highly resistant to extreme temperature fluctuations. They do not expand or contract, making them a premier choice for long-term durability.
  • Wood Windows: The gold standard for historic properties. They offer unmatched natural insulation and classic beauty, though they require regular painting or staining to prevent rot.
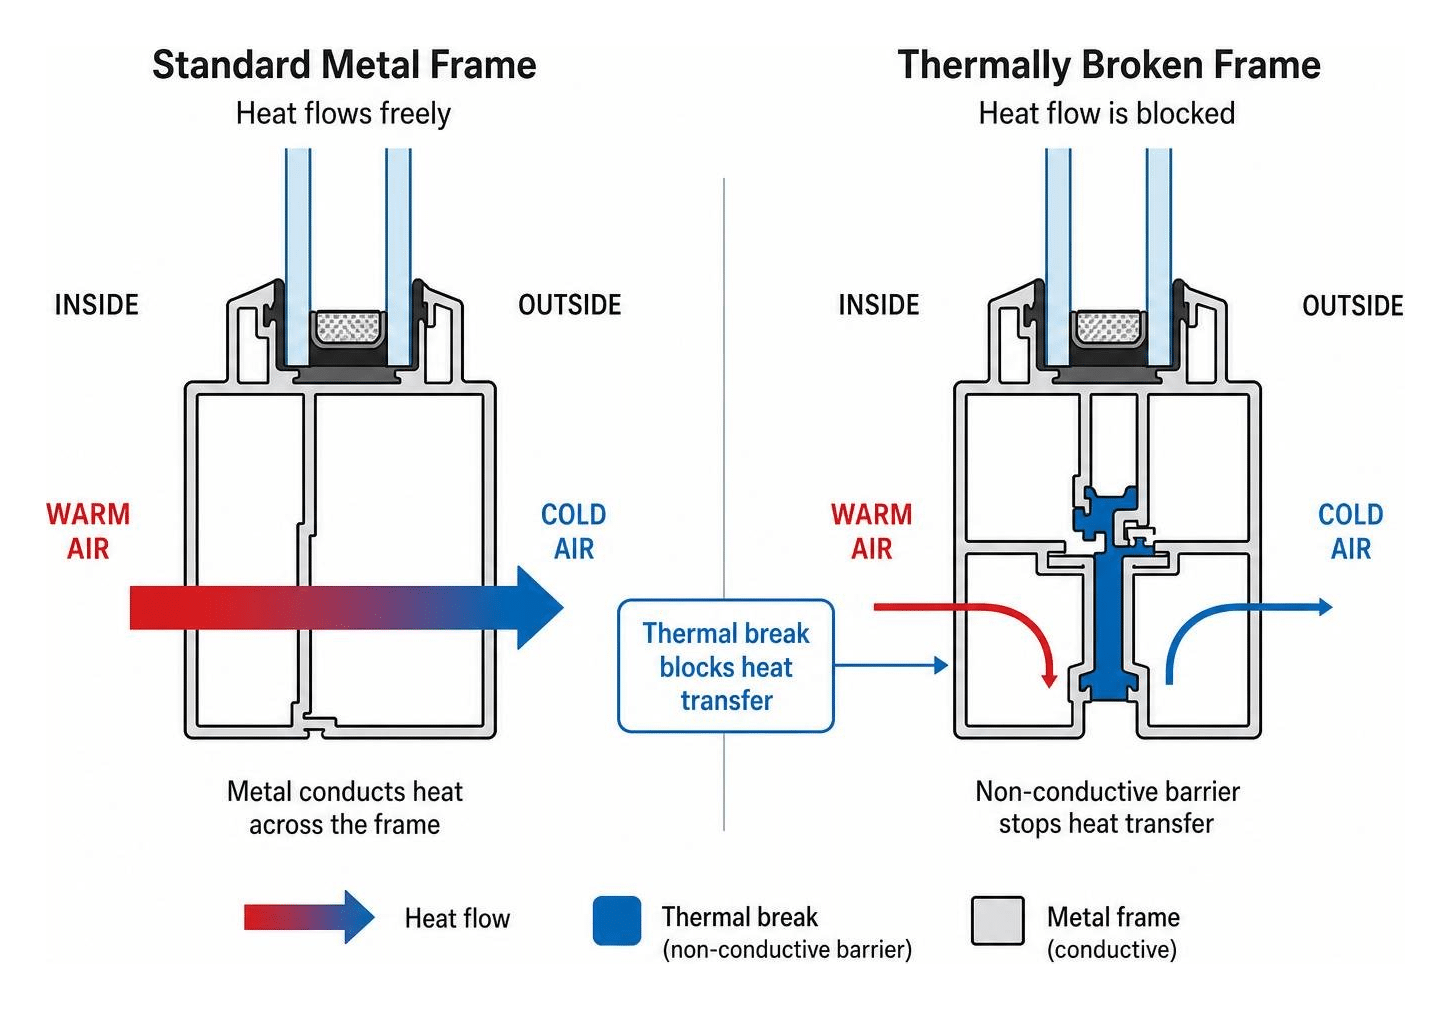
  • Aluminum Windows: Sleek and modern, but they conduct heat and cold easily, making them less thermally efficient than vinyl or fiberglass unless they feature a thermal break.

Financing and Energy Bill Savings

While the upfront cost of window replacement can feel daunting, the long-term financial relief on your utility bills is substantial. Energy Star estimates that replacing drafty single-pane windows in a Chicago home can save you $236 to $319 per year. Even if you are upgrading from older double-pane windows, you can still expect to save $87 to $126 annually.

Over the lifespan of your windows, those savings add up to thousands of dollars. Plus, upgrading to energy-efficient windows cuts your home’s indirect greenhouse gas emissions by about 449 pounds per year, helping the environment while protecting your wallet.

To make these projects more manageable, we recommend looking into flexible financing options. Many local homeowners take advantage of specialized home improvement financing programs, such as 0% interest promotional periods for 12 to 18 months, or low-interest home equity lines of credit (HELOCs) to fund their exterior renovations.

Best Window Types and Materials for Chicago’s Climate

Chicago’s climate is uniquely demanding. We experience freezing lake-effect snow in January, rapid temperature swings in spring, and blistering, humid heat waves in July. This constant cycling of hot and cold causes lesser materials to expand, contract, warp, and ultimately lose their airtight seals.

Historic Chicago home remodel

When preparing your home for our brutal weather, we highly recommend checking out our guide on the steps you should take to winterize your Chicago home to ensure your property’s entire envelope is sealed and secure.

To combat the elements, your replacement windows should feature:

  • Low-Emissivity (Low-E) Glass: This microscopic metallic coating reflects infrared heat. In the winter, it bounces your home’s heat back inside. In the summer, it blocks solar heat from entering, while also filtering out damaging UV rays that fade your furniture and hardwood floors.
  • Argon Gas Fills: Argon is a dense, non-toxic gas inserted between double or triple panes of glass. Because it is denser than air, it provides superior thermal insulation, preventing cold drafts from radiating through the glass.
  • Multi-Chambered Vinyl or Fiberglass Frames: These frames trap air inside small pockets, creating a highly effective thermal barrier.

Different architectural styles in Chicago call for different window designs:

  • Double-Hung Windows: The classic choice for Chicago two-flats and bungalows. Both sashes slide vertically and tilt inward, which means you can easily wash the exterior glass from inside your home—a lifesaver for second-story rooms!
  • Casement Windows: These windows crank outward. When closed, the sash presses tightly against the frame, creating an exceptionally tight seal against heavy lakefront winds.
  • Bay & Bow Windows: Perfect for expanding the living space of a traditional Chicago bungalow. They project outward, flooding your living room with natural light and boosting your exterior curb appeal.

Full-Frame vs. Pocket Installation and Historic Home Considerations

When planning your project, you must decide between two different installation methods: pocket installation (also known as insert replacement) and full-frame installation.

Decision flow diagram: pocket vs full-frame window replacement

  • Pocket Installation: The installer slides the new window unit directly into the existing, structurally sound wood frame. This is faster, less invasive, and more affordable. However, it slightly reduces your glass viewing area and does not address any hidden rot or water damage inside the wall.
  • Full-Frame Installation: The entire window, including the frame, casing, sill, and trim, is torn out down to the rough stud opening. This allows us to inspect the framing for moisture issues, add fresh insulation, and maximize your glass area. We always recommend full-frame installation if your existing frames are soft, rotting, or severely drafty.

Special Considerations for Chicago Greystones and Victorians

If you own one of Chicago’s iconic historic homes, such as a Bedford limestone greystone or a late-19th-century Victorian, window replacement is a different ballgame.

The original windows in these homes were crafted from highly durable, old-growth wood. If they are structurally sound, restoring them—repairing the sashes, adding modern weatherstripping, and pairing them with high-quality storm window inserts—is often the most cost-effective and architecturally appropriate route. In fact, historic window restoration typically costs $500 to $1,500 per window, whereas custom, historic-compliant replacement windows can run $1,200 to $2,500+ per window.

If replacement is necessary to preserve the home, you must maintain the original proportions, profiles, and materials (typically wood). Using cheap vinyl or aluminum replacements on a street-facing historic facade can ruin the architectural integrity of the home and permanently damage its resale value.

Additionally, historic masonry and lime-based mortar require careful handling. If you are doing extensive exterior work, be sure to read The Complete Guide to Masonry Tuckpointing Chicago to ensure your limestone or brickwork is properly protected during the process.

Permitting Requirements for Window Replacement Chicago

Do you need a building permit to replace windows in Chicago? Yes. In almost all cases, the City of Chicago requires a permit for exterior window and door replacements to ensure compliance with the local building codes and the Chicago Energy Transformation Code.

Fortunately, the city offers the Express Permit Program, which streamlines the process for residential buildings up to 7 stories tall. Under this program, you do not need architectural drawings as long as you are replacing existing windows with units of the same size and opening type.

However, there are strict rules to keep in mind:

  • Condo Association Approval: If you live in a multi-unit building or condo, you must upload a signed condo association approval letter with your permit application.
  • Window Opening Control Devices (WOCDs): Under the Chicago Building Rehabilitation Code, replacement windows on upper floors may require safety devices that limit how far the window can open, preventing accidental falls.
  • Insect Screens: Chicago municipal code mandates that replacement windows must be fitted with tight-fitting insect screens.

Because navigating city hall, building codes, and structural safety can be incredibly confusing, window replacement is one of those home repairs that need pros in Chicago. Attempting a DIY installation or hiring an unlicensed contractor can lead to failed city inspections, costly stop-work orders, and voided manufacturer warranties.

Choosing the Right Window Replacement Chicago Contractor

Your windows are only as good as the hands that install them. Even the most expensive, triple-pane fiberglass window will leak, draft, and fail prematurely if it is not leveled, shimmed, flashed, and insulated correctly.

When looking for a contractor in the local area, whether you are coordinating a project in the city, exploring window replacement in Evanston, IL, or hiring installers for window replacement in Highland Park, IL, keep these best practices in mind:

  1. Verify Licensing and Insurance: Ensure the contractor holds an active Illinois General Contractor license and carries comprehensive liability and workers’ compensation insurance.
  2. Look for Certified Installers: Choose a team whose installers are factory-trained and certified by the specific manufacturers they install. This ensures your lifetime product warranties remain fully valid.
  3. Demand Transparent Communication: A great contractor provides a clear, step-by-step project timeline and stands behind their craftsmanship with a written labor warranty.

For a deeper dive into protecting your investment, read our expert guide on What to Look for When Choosing a General Contractor.

Frequently Asked Questions About Chicago Window Replacement

How long does a typical window replacement project take?

The physical installation of a single window typically takes only 30 to 45 minutes for an experienced crew. For a standard Chicago home requiring 10 to 15 window replacements, the entire project is usually completed in 1 to 2 days. However, custom-ordered windows (especially historic wood profiles) can have manufacturing lead times of 4 to 12 weeks, so it is best to plan your project well ahead of the cold season.

What is the difference between full-frame and pocket window installation?

A pocket installation places the new window insert inside your existing wooden frame, preserving your interior trim but slightly reducing your overall glass area. A full-frame installation removes everything down to the raw wall studs, allowing the installers to replace rotten wood, add fresh insulation, and maximize your natural light.

Do I need a permit to replace windows in a historic Chicago landmark?

Yes. If your home is an individual landmark or located within a designated Chicago Landmark District, any exterior changes—including windows—must be reviewed and approved by the Commission on Chicago Landmarks. You will need to submit a Permit for Landmark Approval (PLA) showing that your new windows perfectly match the original historic wood profiles, operation, and appearance.

Areté Renovators: Your Chicago Window Replacement Experts

Upgrading your home’s windows is a major investment, but it is one that pays dividends in comfort, beauty, and energy savings for decades to come.

At Areté Renovators, we believe the remodeling process should be entirely stress-free. As a premier Chicago-based general contractor, we specialize in complete residential renovations, including high-performance window & door installations.

Our unique, highly structured process pairs you with a dedicated project coordinator and design professionals who manage everything—from pulling city permits and working with historic guidelines to the final walkthrough. We provide daily updates and meticulous attention to detail so you never have to worry about the quality of your home’s envelope.

Ready to transform your home and say goodbye to drafty winters? Give us a call at 773.683.3033 or contact us today to get started!

Top 10 Kitchen Remodeling Chicago Companies

Modern kitchen with white cabinets, a large white island, brass hardware, and a stainless fridge.

Top 10 Kitchen Remodeling Chicago Companies

The Honest Guide to Finding the Best Kitchen Remodeling in Chicago

If you’re researching kitchen remodeling in Chicago, here are the top service standards and approaches homeowners trust in 2026:

  1. Full-Service Design-Build (e.g., Areté Renovators) — Complete design-to-build integration, dedicated project coordinator, daily updates, and seamless project management.
  2. Architect-Led Design-Build — Firms with architects and structural engineers on retainer for major structural changes.
  3. Owner-Operated General Contractors — Smaller, hands-on teams with decades of local experience in specific neighborhoods.
  4. Specialty Kitchen & Bath Remodelers — Firms focusing exclusively on wet spaces with specialized trade pricing.
  5. Condo & HOA Specialists — Contractors with deep experience navigating strict high-rise rules and building management.
  6. Historic Home Specialists — Experts in restoring and updating vintage greystones, bungalows, and historic properties.
  7. Cosmetic Refresh & Fit-Out Specialists — Quick-turnaround teams focusing on cabinet refacing and surface updates.
  8. Custom Cabinetry & Design Studios — High-end studios focusing on bespoke millwork and luxury finishes.
  9. Eco-Friendly & Green Builders — Contractors specializing in sustainable materials and energy-efficient designs.
  10. Budget-Friendly Design-Build — Entry-level design-build services tailored for smaller, straightforward projects.

Chicago kitchens are not simple projects. You’re dealing with vintage bungalows, high-rise condos with strict HOA rules, greystones with 70-year-old plumbing, and city permits that can take 7–9 weeks to clear. That’s before you’ve chosen a single cabinet.

Most homeowners feel overwhelmed before they’ve even gotten their first quote. The stakes are real — a full gut renovation using high-end materials in Lincoln Park can run $100,000–$150,000, while a Logan Square remodel using builder grade materials might come in under $40,000. The difference often comes down to who you hire and how well they manage the process.

We will outline the top 10 kitchen remodeling approaches and service standards in Chicago based on licensing, transparency, design capabilities, and real project results — so you can make a confident decision without wading through dozens of contractor websites.

overview of Chicago kitchen remodeling costs, timelines, and key considerations for 2026 infographic

How to Evaluate the Top 10 Kitchen Remodeling Chicago Companies

When you begin your search for the perfect remodeling partner, it is easy to get lost in a sea of search results. To make an informed decision, you must first understand the three primary business models operating in the Chicago market: design-build firms, general contractors, and specialty kitchen remodelers.

  • Design-Build Firms: These companies handle your entire project under a single contract. They employ in-house designers, drafters, and builders. This model is highly integrated, preventing communication gaps and ensuring your project stays on schedule and within budget.
  • General Contractors: These professionals focus primarily on the physical construction. While some have design partners, you may need to bring your own architectural plans or coordinate the design details yourself.
  • Specialty Kitchen Remodelers: These outfits specialize exclusively in kitchens and bathrooms, often focusing on cosmetic updates like cabinet refacing, countertop overlays, or quick-turnaround installations rather than structural wall removals.

To help you visualize your new space before construction begins, top-tier firms utilize advanced 3D rendering and design visualization technology. This allows you to view a digital version of your kitchen, adjusting layout details, cabinet colors, and countertop options before a single hammer is swung.

Choosing the Right Partner for Kitchen Remodeling in Chicago

To ensure your renovation is smooth and stress-free, you need to know How to Choose a Kitchen Remodeling Contractor Chicago. One of the most critical factors is whether the company provides a dedicated project manager or project coordinator to serve as your single point of contact.

Without a single point of contact, you may find yourself playing telephone between designers, plumbers, electricians, and carpenters. This leads to costly communication gaps, scheduling delays, and design mismatches. When we manage a project, we ensure that a dedicated professional handles every detail—from material procurement to scheduling trades—keeping you informed with daily updates.

Our team uses the Buildertrend platform to share digital updates about your project. Here you can find any documents, progress photos, and messages necessary to keep you in the loop at all times.

Vetting Licenses, Insurance, and Warranties

Never hire a contractor based on a handshake or a cheap estimate. In the City of Chicago, any legitimate remodeler must hold an active Licensed General Contractor (TGC) credential. This license proves they have passed background checks, registered with the city, and carry the proper insurance.

When vetting potential companies, always request and verify the following:

  • Active TGC License: Ensure it is registered and in good standing with the City of Chicago.
  • Liability Insurance: A minimum of $2M in general liability insurance is highly recommended to protect your property and neighboring units, especially in high-density areas like Lakeshore East or Irving Park.
  • Worker’s Compensation: This protects you from liability if a worker is injured on your property.
  • NKBA Certifications: Look for designers certified by the National Kitchen and Bath Association, which indicates advanced training in kitchen spatial planning and safety.
  • Labor and Material Warranties: A reputable contractor should offer a minimum of a one-year workmanship warranty, alongside manufacturer warranties on cabinets, countertops, and appliances.

Be sure to ask for references, read local reviews, and look closely at their portfolio of completed projects in neighborhoods like the Loop, Lakeview, River North, Evanston, or Highland Park to ensure they have experience with your specific home type.

Cost vs. Value: What to Expect for Kitchen Remodeling in Chicago in 2026

Budgeting is often the most stressful part of planning a renovation. To help you plan, it is vital to understand the realistic Kitchen Remodeling Cost in Chicago across different project scopes.

Remodel Tier Average Cost Range (2026) Key Inclusions Typical Timeline
Cosmetic Refresh $15,000 – $22,000 Cabinet refacing, countertop overlays, new backsplash, paint, and basic hardware updates. 1 – 3 Weeks
Mid-Range Full Gut $25,000 – $90,000+ New semi-custom cabinetry, quartz countertops, updated flooring, minor plumbing/electrical relocations, and mid-tier appliances. 4 – 8 Weeks
High-End Luxury $100,000 – $150,000+ Custom two-tone cabinets, waterfall quartz islands, premium appliances, wet bars, extensive structural wall removals, and custom lighting. 5 – 10+ Weeks

Full Gut Renovations vs. Cosmetic Refreshes

If your existing kitchen layout works well but looks dated, a cosmetic refresh might be the perfect solution. Techniques like cabinet refacing (replacing only doors and drawer fronts while keeping the existing cabinet boxes) and countertop overlays can transform your space in a matter of days, but it likely won’t solve the core issues you have with your living space.

If you have a cramped layout, dated 1980s infrastructure, or damaged subfloors, a full gut renovation is necessary. This process involves demolishing the space down to the studs. While more invasive, it allows our teams to perform essential infrastructure upgrades, such as replacing old plumbing, updating rough electrical systems to support modern appliances, and leveling uneven floors.

Areté primarily works with high-end, luxury design-build projects (both commercial and residential).

Neighborhood ROI: Logan Square, Wicker Park, and Lincoln Park

In Chicago’s competitive real estate market, kitchen renovations deliver some of the highest returns on investment (ROI). However, the exact return depends heavily on your neighborhood:

  • Logan Square (60647): Kitchen remodels here typically run anywhere from $25,000 to $150,000+. Updated kitchens in Logan Square command a strong 65% to 80% return at resale. Properties with modern layouts sell significantly faster than those with dated 1980s or 1990s kitchens.
  • Wicker Park: Renovations featuring open-concept layouts, custom cabinetry, and premium quartz countertops command a 10% to 20% price premium over unrenovated comparables. A complete gut renovation here typically runs $55,000 to $120,000+.
  • Lincoln Park: In this high-value market, luxury benchmarks are common. A full high-end remodel—often including waterfall quartz islands, custom two-tone cabinetry, wet bars, and professional-grade appliances—typically runs $100,000 to $150,000+.

If you are remodeling a historic single-family home in suburban areas like Highland Park, it is essential to work with an experienced team that understands how to preserve historic architectural charm while integrating modern luxury and high-end functionality.

Timelines, Permits, and Structural Changes

Before you begin, you must have a clear understanding of How Long Does a Chicago Kitchen Remodel Take. A typical mid-to-high-range kitchen renovation takes anywhere from 4 to 8 weeks of active construction. However, the total project duration from initial consultation to final walkthrough is often longer due to permitting, material lead times, and design phases.

Chicago luxury high-end kitchen remodeling services

Working with City of Chicago Permits and HOA Rules

One of the biggest mistakes homeowners make is starting construction without the proper paperwork. In Chicago, permits are legally required for structural wall removals, plumbing relocations, and electrical upgrades. Homeowners can review official permit guidance through the City of Chicago Department of Buildings permit resources before planning major work.

If your project requires a Standard Plan Review by the city, the permitting process can take approximately 7 to 9 weeks. It is crucial to submit these plans early so the review runs concurrently with your cabinet manufacturing lead times.

For those living in high-rise buildings or vintage co-ops in Lakeshore East, navigating condo board and HOA rules is another layer of complexity. These projects require close coordination with the building’s chief engineer, submission of formal alteration agreements, strict elevator scheduling, and neighbor notifications before any demolition can begin.

When you work with our trusted design-build firm, you don’t have to worry about the hassle of securing your own permits.

Removing Walls for Open-Concept Layouts

Many Chicagoans dream of removing a wall to connect a cramped kitchen with an adjacent dining or living room. Before you plan an open-concept layout, a licensed structural engineer must conduct a thorough structural assessment to determine if the wall is load-bearing.

If the wall is load-bearing, a temporary support system must be built, and a structural steel or LVL beam must be installed to carry the load. Once the wall is removed, achieving visual continuity is key. This often requires restaining the hardwood floors across the entire level so the transition between the kitchen and living areas is completely seamless, maintaining clean sight lines and a natural flow.

Planning your kitchen’s aesthetic is where your vision truly comes to life. To explore how to blend classic Chicago architecture with modern functionality, read our guide on Chicago Kitchen Design.

  • Two-Tone Cabinetry: Using a darker color for lower cabinets or islands (such as navy, forest green, or charcoal) paired with lighter upper cabinets (white, cream, or light wood) adds visual depth and makes smaller spaces feel larger.
  • Waterfall Islands: Extending the countertop material (typically quartz) vertically down the sides of the island to the floor creates a striking, sculptural focal point.
  • Dedicated Beverage Zones: Homeowners are increasingly requesting dedicated wet bars or coffee stations equipped with small sinks, beverage fridges, and built-in storage to keep guest traffic out of the main cooking zone.
  • Biophilic Design: Bringing natural elements indoors through the use of natural wood tones, stone textures, and herb garden windows.
  • Layered Lighting: Combining recessed ceiling lights for ambient coverage, decorative pendant lights over islands for task lighting, and under-cabinet LED strips for accent illumination.

Best Materials for Countertops and Cabinets

Selecting the right materials ensures your kitchen remains beautiful and functional for decades:

  • Quartz Countertops: Engineered quartz remains the top choice for Chicago homeowners. Materials like MSI Tier 1 quartz offer exceptional durability, require zero sealing, and are highly resistant to stains and scratches. They also provide superior color and pattern consistency for clean seam matching.
  • Granite and Marble: While granite offers excellent heat resistance, and marble provides unmatched classic beauty, both are porous materials that require regular sealing and are susceptible to staining.
  • Custom vs. Semi-Custom Cabinets: Sourcing high-quality cabinetry is essential. Opting for solid wood box construction, dovetail drawer joints, and premium soft-close hinges ensures your cabinets withstand daily wear. Sourcing locally made cabinetry can also significantly reduce lead times and bypass shipping delays.

Frequently Asked Questions about Chicago Kitchen Renovations

How long does a typical kitchen remodel take in Chicago?

Active construction for a mid-range to high-end kitchen remodel typically takes 4 to 8 weeks. However, you must factor in 7 to 9 weeks for Chicago city permit reviews (if structural or major utility work is involved) and an additional 3 to 6 weeks for HOA approvals if you live in a condo building. Finalizing your design and material selection usually takes 4 to 8 weeks before construction starts.

Can I live in my home during a kitchen renovation?

Yes, many homeowners choose to live in their homes during construction. To make this experience manageable, read our Helpful Kitchen Remodeling Tips for Chicago Homeowners. We recommend setting up a temporary kitchen in an adjacent room with a microwave, coffee maker, and mini-fridge. Our crews use plastic dust barriers to seal off the work zone and perform daily cleanups to keep the rest of your home livable.

If you are doing a renovation with us that requires relocating, we are able to help you arrange temporary living through our sister company, Areté Property Development. We have you covered.

What financing options and payment plans are available?

Most reputable remodeling companies utilize a structured payment schedule tied to project milestones (e.g., a deposit upon signing, payments after demolition, cabinet delivery, and final walkthrough). Many homeowners finance their renovations through Home Equity Lines of Credit (HELOCs), cash-out refinances, or personal home improvement loans.

Areté is Your Preferred Chicago Design-Build Firm

A kitchen remodel is a significant investment that completely transforms how you experience your home. The unique challenges of Chicago’s housing stock—from permitting delays to complex condo regulations—requires an experienced, trusted partner.

At Areté Renovators, we pride ourselves on our highly structured, client-focused process. From your initial design consultation to the final walkthrough, we provide a dedicated project coordinator to manage every detail and keep you informed with daily updates.

If you are ready to take the first step toward your dream kitchen, learn more about what the Chicago kitchen remodeling process is like with Areté Renovators and explore our comprehensive kitchen remodeling services in Chicago. Reach out to us to schedule your initial meeting or give us a call at 773.683.3033. Let’s build something beautiful together!
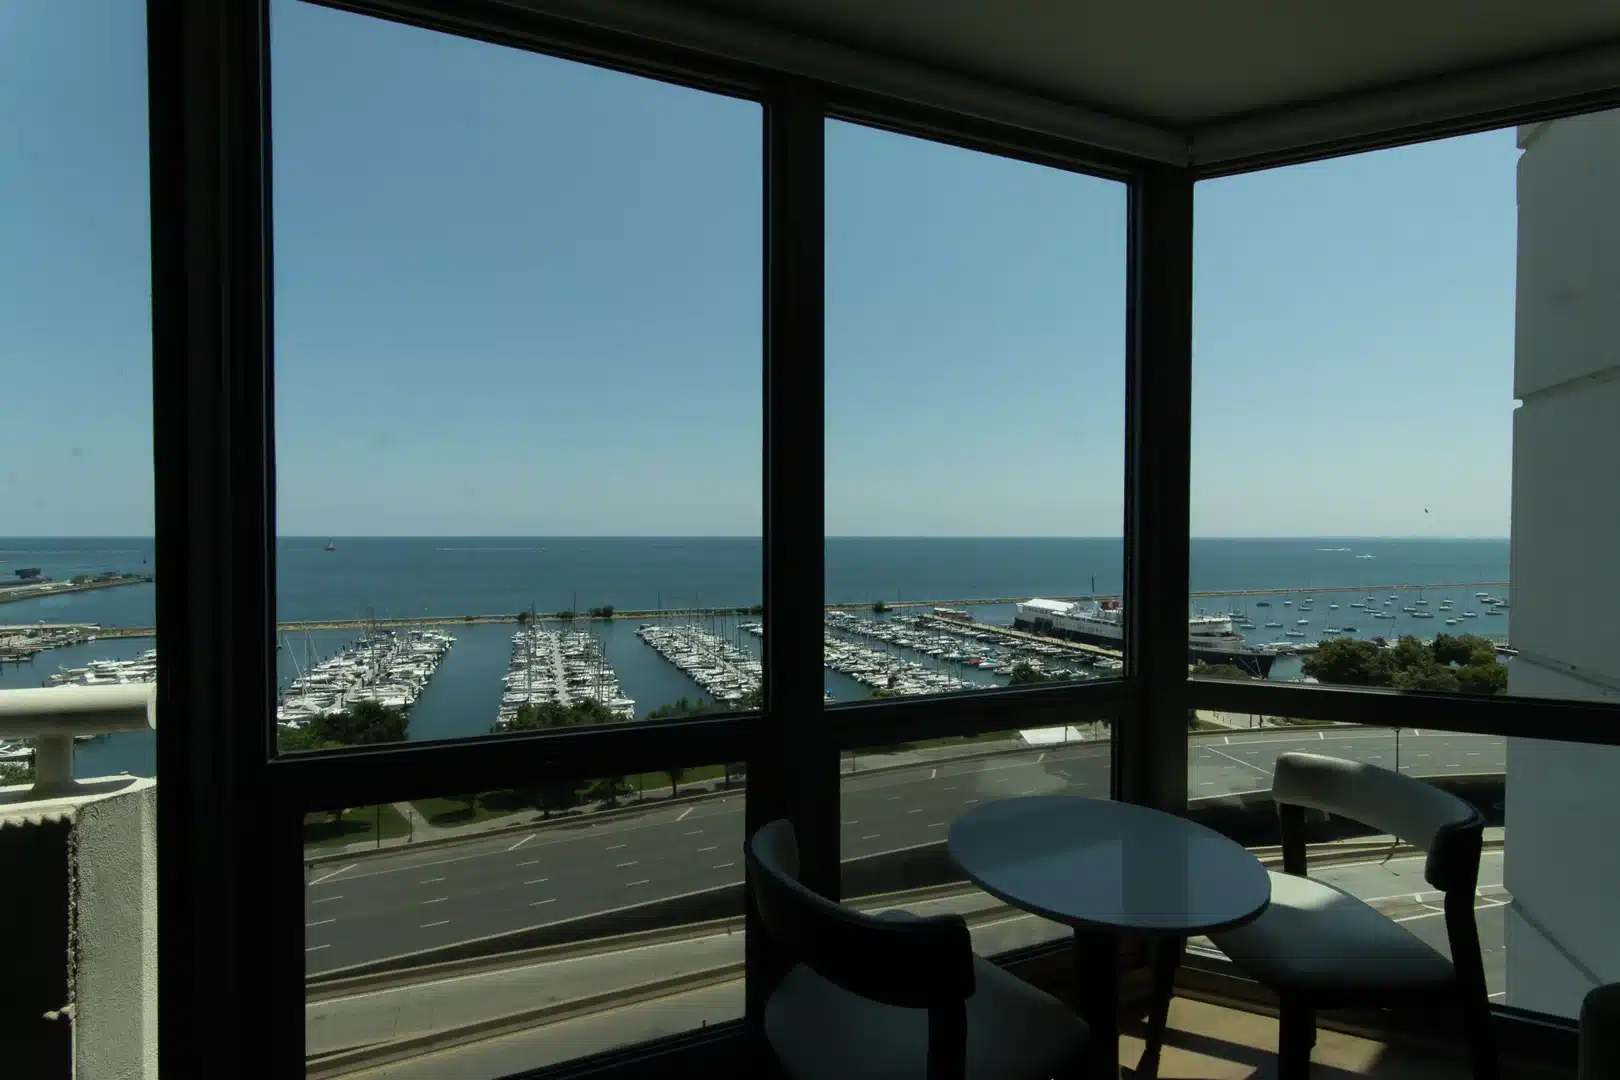
Chicago Tuckpointing Rush Projects and How to Get Them Done Fast

Brick archway entry to a townhouse with white railings and stairs on both sides leading to red front doors on a covered porch area.

Chicago Tuckpointing Rush Projects and How to Get Them Done Fast

When Chicago Brick Can’t Wait: A Quick Guide to Rush Tuckpointing

Chicago tuckpointing rush projects are a real and urgent need for property owners dealing with active leaks, city code violations, structural hazards, or deteriorating mortar that simply cannot wait for a scheduled spring appointment.

Here’s what you need to know right away:

  • What qualifies as a rush project: Active water infiltration, failed parapet walls, crumbling chimney mortar, rusted lintels cracking surrounding brick, or a city violation notice with a compliance deadline
  • How fast can work start: Reputable Chicago masonry contractors with emergency capacity can mobilize within 24-72 hours for urgent structural repairs
  • What it costs: Emergency tuckpointing typically runs $7-$20 per square foot for commercial work, with mobilization premiums on top for rush scheduling; residential repairs range from a few hundred to several thousand dollars depending on scope
  • How long it takes: Most urgent residential repairs take 1-3 days; a full chimney rebuild above the roofline can be completed in 1-2 days by an experienced crew
  • The risk of waiting: A single cracked brick costing $50-$150 to fix today can escalate into a $8,000-$40,000+ wall rebuild if left unaddressed for five or more years

We are here to cover everything you need to manage an urgent tuckpointing job in Chicago — from understanding what triggers the emergency, to finding the right contractor, to making sure the rushed work still lasts 20-30 years.

Chicago’s brutal freeze-thaw cycles, aging brick stock, and strict municipal code enforcement create a perfect storm for masonry emergencies. One week of water getting behind a failed mortar joint in January can do the same damage as years of gradual weathering. And once a city inspector issues a violation notice, the clock starts ticking.

The good news: a rush project doesn’t have to mean a sloppy one — if you know what to look for and how to manage the process.

Chicago tuckpointing rush projects word guide:

What Triggers Urgent Masonry Repairs in the Windy City?

cracked parapet wall requiring urgent tuckpointing in chicago

When we talk about masonry in Chicago, we are talking about the very bones of our neighborhoods. From the historic brick bungalows of Irving Park to the modern mid-rises in Lakeshore East, brick is everywhere. But brick is not invincible.

Unlike the clay units themselves, which can easily survive for over a century, the mortar holding them together has a much shorter shelf life. When mortar fails, water moves in. In Chicago, water inside your walls is a ticking clock.

To understand why a project suddenly shifts from a “sometime next year” chore to an immediate emergency, we have to look at how Chicago’s climate and structural elements interact. When mortar joints crumble, they allow rain and melting snow to penetrate the exterior envelope. Once inside, this moisture undergoes rapid freeze-thaw cycles, expanding with incredible force. This expansion causes “spalling”—where the faces of the bricks literally pop off—and destroys the structural bond of the wall.

If you are noticing these warning signs, reading The Complete Guide to Masonry Tuckpointing Chicago can help you understand the full scope of structural masonry maintenance.

Emergency Leaks and Structural Hazards

The most common trigger for a rush project is an active, destructive leak. These leaks rarely start where you think they do. A water stain blooming on a third-floor bedroom ceiling is often traced back to a failed parapet wall on the roof.

Parapet walls and firewalls are highly exposed to the elements on both sides. When their coping stones crack, or the mortar joints directly beneath them disintegrate, they act like sponges, soaking up gallons of water that bypass the building’s roofing envelope entirely.

Another major hazard is “rust jacking.” This occurs when the steel lintels—the horizontal structural beams supporting the brick above windows and doors—are exposed to moisture because of failed caulking or missing flashing. As the steel rusts, it expands. This expansion exerts thousands of pounds of pressure on the surrounding masonry, lifting and cracking the brickwork directly above the window frames.

If you notice horizontal or diagonal cracks radiating from the corners of your windows, you are looking at a structural hazard that requires immediate lintel replacement and tuckpointing to prevent a localized wall collapse.

Resolving City Code Violations on an Urgent Basis

If you own a building in Chicago, receiving a municipal masonry code violation is a stressful experience. The City of Chicago takes facade safety seriously, especially for multi-family and commercial properties. When an inspector spots deteriorating parapet walls, bowing brick veneer, or crumbling chimneys, they will slap the property with a violation notice.

These notices come with strict compliance windows and the threat of escalating daily fines or court appearances. To get your property back into compliance quickly, you must follow a specific process:

  1. Hire a Licensed Contractor: The city requires that structural masonry repairs be performed by a contractor who has passed the City of Chicago supervising mason licensing exam.
  2. Pull the Right Permits: Depending on the height of the building and the location (such as over a public sidewalk), you will need specific building and scaffolding permits.
  3. Correct the Violations: The contractor must execute the repairs in strict accordance with the International Building Code (IBC) and local municipal amendments.
  4. Schedule a Re-inspection: Once the work is complete, the licensed supervising mason certifies the repairs, allowing you to resolve the case with the city and avoid further penalties.

Managing Chicago Tuckpointing Rush Projects Safely

Executing a rush project requires a delicate balance of speed, logistical planning, and safety. You cannot simply throw a ladder against a building and start grinding out mortar. In dense Chicago neighborhoods, safety and municipal compliance are paramount.

process flow for chicago tuckpointing rush projects

When we coordinate a fast-tracked project, we focus heavily on mobilization and safety protocols. If a facade rises above a public sidewalk or alleyway, we must secure sidewalk canopy permits and install protective scaffolding or safety netting. This protects pedestrians from falling debris and dust during the grinding phase.

Furthermore, we coordinate closely with neighbors. Setting up scaffolding in tight gangways often requires placing equipment on adjacent properties, which demands clear communication and professional liability coverage to protect landscaping and structures.

Winter Weather Precautions and Freeze-Thaw Prevention

A challenge of managing chicago tuckpointing rush projects is dealing with our unpredictable weather. While spring and fall offer ideal masonry conditions, emergencies don’t check the forecast. If your chimney is collapsing in January, it has to be fixed immediately.

To perform tuckpointing safely in freezing temperatures, we must take strict precautions to prevent freeze-thaw damage to the fresh mortar:

  • Heated Enclosures: We construct temporary plastic tents around the work area and use space heaters to keep the ambient temperature of the masonry wall above 40°F (4°C).
  • Thermal Blankets: Once the new mortar is applied, we cover the masonry with insulated blankets to retain heat during the critical curing phase.
  • Temperature Monitoring: Mortar joints must maintain a minimum temperature of 40°F for at least 48 hours post-application to cure properly and achieve their rated compressive strength.
  • Admixtures: In specific cases, we utilize cold-weather admixtures to accelerate the setting time, though we never compromise on temperature controls.

Sourcing Materials and Matching Historic Chicago Common Brick

If you live in a historic home in Evanston, Irving Park, or Highland Park, your building was likely constructed using Chicago common brick. Produced from local clay along the Chicago River from the late 19th century through the mid-20th century, these bricks are unique. They are soft, highly porous, and vary widely in color from buff yellow to salmon pink.

When rushing a repair on a historic building, using modern, machine-pressed brick and hard Type S or Type M mortar is a recipe for disaster. Modern mortars have a high compressive strength (often over 1,800 PSI), which is far harder than the soft historic brick.

When the building naturally shifts or undergoes freeze-thaw cycles, the hard mortar will not give; instead, it will crush the soft historic brick, causing widespread spalling and structural failure.

To preserve the architectural integrity of historic properties, we source period-matching salvage brick from local architectural reclamation yards. We also custom-mix lime-rich, low-strength mortars (often Type N or historically accurate lime-sand mixes) that match the original mortar in strength, color, and joint profile. This ensures that even under a tight deadline, the repair behaves structurally like the rest of the wall.

Costs, Timelines, and Avoiding Common Mistakes

To help you budget and plan, let’s look at how emergency interventions compare to planned, seasonal masonry maintenance.

Project Type Average Cost Range Typical Mobilization Time Project Duration Expected Lifespan
Emergency Tuckpointing $15 – $25 / sq. ft. 24 – 72 Hours 1 – 3 Days 20 – 30 Years (if done right)
Planned Tuckpointing $10 – $20 / sq. ft. 2 – 6 Weeks 3 – 5 Days 20 – 30 Years
Emergency Chimney Rebuild $5,000 – $10,000+ 48 – 72 Hours 1 – 2 Days 30+ Years
Planned Chimney Rebuild $4,000 – $8,000+ 4 – 8 Weeks 2 – 3 Days 30+ Years

For more detailed information on standard masonry processes, you can read our dedicated guide on Masonry Tuckpointing.

Financial Realities of Chicago Tuckpointing Rush Projects

Why do rush projects cost more? It comes down to logistics and labor. When a contractor has to reshuffle their crew’s schedule to address an active leak or a city violation, they incur mobilization premiums.

Additionally, emergency work often requires overtime labor to complete the grinding and tuckpointing before an incoming storm or a court deadline.

Scaffolding and equipment costs also rise on short notice. Renting, transporting, and erecting scaffolding, safety canopies, and winter heating equipment under tight timelines requires dedicated coordination.

However, as shown in our cost escalation timeline, paying a premium for a rush tuckpointing repair today is vastly cheaper than ignoring the problem and facing a full structural wall rebuild costing upwards of $20,000 later.

Avoiding Quality Pitfalls During Chicago Tuckpointing Rush Projects

When timelines are compressed, some contractors cut corners. To ensure your rush project doesn’t fail within two winters, watch out for these common mistakes:

  • Inadequate Joint Preparation: The single most common cause of premature tuckpointing failure is failing to grind out the old mortar to the proper depth. Old mortar must be routed out to a minimum depth of twice the joint’s width, or at least 3/4 inch, to ensure the new mortar has a solid cavity to bond with. Simply “smearing” new mortar over crumbling joints will result in the new material falling off within a year.
  • Poor Mortar Color Matching: Rushing the mortar mixing process often leads to mismatched, patchy walls. A professional mason must analyze the existing mortar under natural sunlight, create multiple test panels, and document mixing ratios to match the aged color and texture.
  • Micro-Cracks from Power Tools: While angle grinders speed up the work, an inexperienced hand can easily nick the surrounding brick, creating micro-cracks that allow water to enter. In historic structures, hand tools are often required to preserve the brick edges.
  • Using Impermeable Sealants: Applying heavy, non-breathable sealants over fresh repairs traps moisture inside the wall. Instead, use high-quality, breathable masonry sealants that block liquid water from entering while allowing trapped vapor to escape safely.

Frequently Asked Questions about Urgent Tuckpointing

If you are dealing with a sudden masonry issue, you likely have questions about how these fast-tracked projects unfold. Here are the answers to some of the most common questions we receive from property owners in Chicagoland.

How long does an emergency tuckpointing repair typically take to complete?

For most residential properties, an emergency repair can be completed in 1 to 3 days. A highly experienced masonry crew can completely tear down a deteriorating chimney above the roofline, replace the internal clay flue liner, and rebuild it with matching brick and a new concrete cap within 1 to 2 days.

Active leaks at window frames or parapet walls can often be temporarily stabilized or fully repaired in a single day, depending on accessibility and the weather.

Can tuckpointing be done in freezing Chicago winter temperatures?

Yes, but it requires specialized techniques and equipment. The mortar must be kept above 40°F (4°C) during application and for at least 48 hours afterward to cure properly.

We achieve this by building insulated, heated enclosures over the work areas and utilizing thermal blankets. Cold-weather admixtures can also be used to safely accelerate setting times under professional supervision.

What happens if I ignore a city masonry code violation?

Ignoring a City of Chicago masonry code violation can lead to severe consequences. The city can issue escalating daily fines, refer your case to the Department of Business Affairs and Consumer Protection, or initiate legal action in housing court.

Beyond the legal and financial penalties, ignoring deteriorated masonry risks structural failure, interior water damage, mold growth, and safety hazards for pedestrians.

Masonry and Tuckpointing Services in Chicago

When a masonry emergency strikes, you need a partner who can move quickly without sacrificing the craftsmanship your building deserves. At Areté Renovators, we bring a highly structured, client-focused process to every project we undertake.

Whether your property is a historic home in Evanston, a classic bungalow in Irving Park, or a residence in Highland Park, we treat your building with the care and precision it demands.

Our unique approach pairs you with a dedicated project coordinator who manages the entire timeline, permits, and material sourcing, while providing you with daily updates so you are never left in the dark. We make sure that even under tight deadlines, your tuckpointing is executed to the highest professional standards, ensuring your masonry remains durable, beautiful, and weather-tight for the next 20 to 30 years.

restored historic chicago brick building

Don’t let a minor crack turn into a major structural failure. Get started with professional masonry and tuckpointing services today. Call us at 773.683.3033 or contact us to schedule an honest, on-site consultation with our expert team.

The Best Window Installation Chicago Has to Offer

window installation chicago

The Best Window Installation Chicago Has to Offer

Why Chicago Homeowners Are Prioritizing Window Installation Right Now

If you’re researching window installation in Chicago, here’s a quick look at the key facts to know:

Average cost per window in Chicago: $450–$650, with premium installs reaching $750–$1,250.

Chicago winters are brutal. And if your windows are old, they could be costing you more than just comfort.

Drafty windows can cut your home’s energy efficiency by up to 30% — that adds up to roughly $298 a year in wasted heating and cooling costs for the average Chicago homeowner.

That’s not a small number. And it doesn’t include the noise, the cold spots by the couch, or the condensation that creeps in every January.

Whether you live in a classic Chicago bungalow, a greystone two-flat, or a modern North Shore home, replacing your windows is one of the highest-impact upgrades you can make. But with dozens of companies competing for your business — and prices ranging from a few hundred to over a thousand dollars per window — it’s easy to feel overwhelmed before you even get a single quote.

This guide cuts through the noise. We’ll walk you through how to choose the best installers in Chicago, what materials actually hold up in this climate, what you’ll realistically pay, and how to avoid the contractors you should never call back.

Chicago window installation cost breakdown and energy loss infographic infographic

Choosing the Right Window Installation Chicago Service

Finding a contractor in the third-largest metropolitan area in the country can feel like searching for a needle in a haystack. With so many options, how do you separate the highly skilled, licensed professionals from the fly-by-night operations?

When you begin your search for window installation in Chicago, your first step should always be verifying credentials. Chicago has strict building codes, and any reputable installer must carry active licensing, comprehensive general liability insurance, and worker’s compensation. A lack of proper licensing is an automatic dealbreaker. If a contractor cannot or will not show you their Chicago general contractor license or local specialty permits, walk away.

Warranties are another critical dividing line. You want to look for a dual warranty: one from the manufacturer covering the physical window unit (glass, frames, seals, and hardware) and another from the installer covering the workmanship. Many top-tier installers provide a lifetime warranty on parts, but the labor warranty is what protects you if a window starts leaking or draft wind begins whistling through a poorly sealed frame a year down the road.

Professional window installation in Chicago

The home improvement industry is notorious for high-pressure sales tactics. If you host an in-home consultation and encounter any of the following red flags, it is time to show the salesperson the door:

  • The “Spouse-Present” Rule: If a company insists that both partners or homeowners must be present for a simple quote, they are setting you up for a high-pressure, one-call-close sales pitch. They want both decision-makers in the room so you can’t use the “I need to talk to my spouse” boundary to think things over.
  • “Today Only” Pricing: If an estimator offers you a price of $15,000, but drops it to $9,000 the moment you hesitate—claiming the discount is only valid if you sign a contract right then and there—they are inflating their initial pricing. Professional, honest contractors provide transparent, fixed-price proposals that remain valid for at least 30 days.
  • Vague “Lifetime” Warranties: A “lifetime warranty” sounds great, but whose lifetime? The window’s? Yours? The company’s? Always read the fine print. True lifetime warranties are often prorated, meaning their coverage decreases as the window ages, or they may exclude labor entirely.
  • Skipping the Permits: If an installer suggests doing the work without pulling the necessary local permits to “save you money,” they are cutting corners. Unpermitted work can complicate future home sales and may violate local municipal codes.

When you are investing in larger updates like Exterior Remodeling, you want to work with a partner who values transparency and structured project management rather than quick-sale gimmicks.

Evaluating Local Expertise and Service Areas

Chicago is a city of distinct neighborhoods and architectural styles, and your installer needs to understand the specific structural challenges of our local housing stock. A company that primarily installs vinyl windows in modern suburban tract homes might struggle when faced with the delicate masonry of a historic greystone in Logan Square or a classic frame home in Evanston.

Furthermore, make sure your contractor is deeply familiar with the rules of your specific municipality. For example, if you reside in the northern suburbs, you’ll want to ensure compliance with local guidelines in areas like Highland Park. Similarly, if you are updating a property in historic neighborhoods like Irving Park, working with experts who understand local architectural preservation and historic replacement guidelines is invaluable.

When evaluating a company’s reputation, look for deep roots in the community. Read reviews from homeowners in your immediate vicinity. A stellar reputation for a comprehensive Home Remodeling project in Lakeshore East or Evanston is a strong indicator that the team understands the unique logistical hurdles of working in high-density areas or historic districts.

Selecting Materials, Styles, and Installation Methods

Choosing the right window material is a balancing act between aesthetics, durability, maintenance, and budget. In Chicago, where the temperature can swing from sub-zero winter chills to humid 90-degree summer days, your material choice directly impacts how long your investment will last.

Window frame overlooking Navy Pier

Vinyl vs. Fiberglass vs. Wood Windows

Let’s break down how the three most popular window frame materials perform under local conditions:

Material Average Cost Lifespan Maintenance Level Pros Cons
Vinyl Budget to Mid-Range 15–30 Years Very Low Affordable, rot-resistant, never needs painting Expands/contracts in extreme cold/heat; can warp over time
Fiberglass Mid-Range to Premium 30–50 Years Very Low 8x stronger than vinyl, highly stable, thin frames, great insulation More expensive than vinyl; fewer color options
Wood Premium 50+ Years (with care) High Unmatched beauty, excellent insulation, historically accurate Prone to rot, warp, and insect damage; requires painting/staining
  • Vinyl Windows: Vinyl is the most popular choice for budget-conscious homeowners. Modern, multi-chambered vinyl frames offer solid thermal efficiency. However, vinyl expands and contracts significantly in extreme temperatures. Over decades of brutal Chicago seasonal shifts, this movement can eventually break the seals around the glass, leading to drafts and condensation.
  • Fiberglass Windows: Fiberglass is rapidly becoming the gold standard for durability. Because fiberglass is made from glass fibers and resin, it expands and contracts at virtually the same rate as the glass panes it holds. This means the structural integrity of the window remains intact through decades of freezing winters and boiling summers. It is exceptionally strong, meaning frames can be thinner to allow for larger glass viewing areas.
  • Wood Windows: Wood offers unmatched warmth and historic charm. In fact, if you live in a landmarked building or a historic district, wood windows may be required. However, they demand regular maintenance. Without consistent painting or staining, Chicago’s heavy snow and rain will eventually lead to rot and warping. That being said, original wood windows in historic Chicago homes were crafted from dense, old-growth wood that is far more durable than modern pine replacements.

Deciding on the Best Window Installation Chicago Method for Your Home

Once you’ve selected your window material, you must choose between two distinct installation methods: full-frame installation and pocket (insert) installation.

  • Full-Frame Installation: This method involves removing the entire existing window structure, including the sashes, the frame, and the interior/exterior trim. This allows the installers to inspect the rough opening for water damage, rot, or structural settling. They can then add modern insulation around the new frame before sealing it up. We highly recommend full-frame installation for older homes, or whenever you are undergoing comprehensive Residential Remodeling, as it ensures the structural integrity of the wall is fully preserved.
  • Pocket (Insert) Installation: In a pocket installation, the existing exterior trim and wood frame are left intact. Only the old window sashes are removed, and a new, slightly smaller window unit (the “insert”) is slid directly into the existing frame. This is a faster, less disruptive, and more economical method. However, it only works if the existing wood frame is completely sound, square, and free of rot. It also slightly reduces your overall glass viewing area, as you are placing a frame within a frame.

Cost, Energy Efficiency, and Local Regulations

Upgrading your windows is a major financial undertaking, but understanding the cost drivers and long-term energy savings can help you maximize your return on investment.

Average Costs and Price Factors

The cost of window replacement in Chicago varies widely based on size, material, glass package, and the complexity of the installation.

  • Standard Replacement: The average cost to replace a single, standard-sized double-hung window in Chicago typically ranges from $450 to $650, with the average sitting right around $600 per window (including basic labor and materials).
  • Premium Custom Installs: For high-end custom wood or fiberglass windows, or complex installations (such as large bay or bow windows, or units in hard-to-reach upper levels), homeowners can expect to pay between $750 and $1,250 per window.

Several factors influence your final project price:

  1. Frame Material: Vinyl is the most affordable, followed by fiberglass, with custom wood being the most expensive.
  2. Glass Technology: Double-pane glass is standard. Upgrading to triple-pane glass or adding specialized Low-E (low-emissivity) coatings and argon gas fills will increase upfront costs but deliver superior energy savings.
  3. Structural Integrity of the Opening: If an installer opens up your wall and finds rotted wood studs or water damage from years of slow leaks, that damage must be repaired before the new window can be safely installed, which will add to labor costs.

Energy Star Savings and Climate Regulations

Because heating and cooling costs are exceptionally high in the Midwest, investing in energy-efficient windows pays off quickly. According to Energy Star, replacing old, drafty single-pane windows with Energy Star-certified models can save Chicago homeowners between $236 and $319 per year on their energy bills.

Beyond the financial savings, upgrading your windows is a great way to reduce your environmental footprint. Switching to energy-efficient windows can cut a household’s indirect greenhouse gas emissions by approximately 449 pounds per year.

Furthermore, local building codes are becoming increasingly strict. Illinois energy conservation codes require replacement windows to meet stringent thermal performance metrics. In many areas, windows must feature a U-rating (which measures heat transfer) of .28 or below to comply with local codes. High-performance double-pane or triple-pane windows utilizing argon gas insulation are often required to hit these targets, ensuring your home remains warm in the winter and cool in the summer.

Frequently Asked Questions About Chicago Window Replacement

How long does the window installation process take?

On average, a professional installation crew can replace a single window in about 30 minutes to an hour, assuming there are no structural surprises. For a standard single-family Chicago home requiring 10 to 15 windows, the entire project is typically completed within 1 to 3 days. The total timeline depends on the project scope, the height of the windows, and whether you chose pocket or full-frame installation.

Should I restore or replace historic wood windows?

If you own a historic Chicago greystone or bungalow, this is a major question. Original wood windows built before the 1940s were made from incredibly dense, old-growth wood that is naturally resistant to rot and can last centuries if properly cared for. If the frames are structurally sound, it is often better to restore the sashes, add modern weatherstripping, and install high-quality storm windows. This preserves the historic character of your home while achieving thermal performance close to modern double-pane windows. However, if the wood is severely rotted or warped beyond repair, a historically accurate wood replacement window is the best path forward.

What are the new Illinois energy efficiency laws for windows?

Illinois continuously updates its energy conservation codes to align with international standards. These regulations mandate that newly installed windows meet low U-factor limits (often .28 or lower) to minimize heat loss during our brutal winters. When selecting your windows, always verify that the products carry the National Fenestration Rating Council (NFRC) label confirming they meet or exceed the current Illinois energy code requirements.

Chicago Professional Window Services

Upgrading your windows is more than just a cosmetic improvement—it is a long-term investment in your home’s structural integrity, comfort, and energy efficiency. We have experience with strict local energy codes. Our professional believe that when selecting the perfect fiberglass or wood frames for your neighborhood’s climate, the choices you make today will impact your home for the next thirty years.

At Areté Renovators, we believe the remodeling process should be entirely stress-free. As a premier Chicago-based luxury design build firm, we specialize in high-quality residential renovations across Chicago, Evanston, and the North Shore. Our unique design-build approach ensures that every detail—from material selection to final trim—is handled by our in-house team. With a highly structured, client-focused process, a dedicated project coordinator, and daily updates, we keep you fully informed and in control from start to finish.

Are you ready to transform your home with beautiful, energy-efficient windows? Explore our Windows & Doors services or learn more about our seamless Design Build Process. Contact us today or call us at 773.683.3033 to schedule your initial meeting.

Architectural Drawing and Design Tools That Do the Heavy Lifting

Architectural drafting tools and blueprints on a bright white desk with rulers, pens, and a pink pencil holder clip on an open notebook field notebook panel on the right with architectural sketches in grayscale on the side

Architectural Drawing and Design Tools That Do the Heavy Lifting

Why Architectural Drawing and Design Is the Foundation of Every Successful Renovation

Architectural drawing and design is the process of creating scaled, technical representations of a building — from early concept sketches all the way to the detailed plans that contractors use on-site.

If you’re looking for the right tools to get started, here’s a quick overview:

Tool Best For Skill Level
Revit Full BIM modeling and team collaboration Professional
AutoCAD Precise 2D and 3D drafting Intermediate–Professional
Cedreo Residential builders and contractors Beginner–Intermediate
SketchUp 3D conceptual modeling Beginner–Intermediate
SmartDraw Quick diagramming and simple floor plans Beginner
Draw.archi AI-powered sketch-to-drawing conversion Beginner

Every renovation — no matter how large or small — starts with drawings. They tell contractors where to build walls, where to run electrical lines, and how every part of the structure fits together.

Without them, projects go over budget, timelines slip, and costly mistakes get made on-site rather than on paper.

One experienced architect put it simply: the goal is to control and direct as many design decisions as possible in the studio, where a change costs nothing, rather than on the construction site, where it can cost thousands.

For homeowners planning a major renovation, understanding the tools and documents behind your project isn’t just interesting — it’s genuinely useful. It helps you ask better questions, spot gaps in a contractor’s process, and feel confident in the decisions being made on your behalf.

This guide walks through the best architectural drawing tools available today, how they compare, and what a complete, professional drawing set actually looks like.

Architectural design workflow from sketch to permitted construction documents infographic

Essential architectural drawing and design terms:

The Evolution of Architectural Drawing and Design: From Ink to AI

Architectural drawing has undergone a massive transformation over the last century. Historically, draftsmen worked standing up at massive angled desks, meticulously laying out lines with ink on vellum or tracing paper. This manual constraint forced architects to be incredibly deliberate. Making a mistake or altering a layout meant scraping ink off paper with a razor blade or completely restarting the sheet—an entirely painful process that nobody wanted to experience twice.

As we look at the design landscape in July 2026, the industry has evolved through several distinct technical eras:

  1. The Hand-Drafting Era: Characterized by physical tools like T-squares, triangles, and compasses. Every line weight was controlled by hand pressure and technical pen sizes.
  2. The CAD (Computer-Aided Design) Revolution: Moving from physical boards to digital screens. This shift allowed for easy copying, pasting, and editing, though it initially remained focused on 2D lines.
  3. The BIM (Building Information Modeling) Era: Transitioning from drawing flat lines to modeling intelligent, 3-dimensional components (like walls, windows, and doors) that carry real-world data and coordinate with each other automatically.
  4. Parametric Design and AI: Today, procedural thinking, algorithmic rules, and artificial intelligence help automate repetitive drafting tasks, simulate environmental performance, and generate structural layouts instantly.

While digital execution is the gold standard for accuracy, many design professionals still argue that analog tools—a simple pencil and paper—remain the best medium for birthing ideas. The digital space is limitless, but creativity often thrives on constraints.

To understand how these concepts bridge the gap between initial inspiration and real-world construction, it helps to look at How Architects Turn Rough Sketches Into Real Construction Drawings.

Evolutionary timeline of architectural design tools from manual drafting boards to AI-driven software

From Napkin Sketches to Schematic Design

Every great building starts as a spark of inspiration, famously captured on the back of a cocktail napkin or a quick sketchpad page. These initial concept sketches and functional diagrams are not meant to be technically accurate; rather, they are tools for “thinking out loud.” They establish relationships between spaces, analyze how natural light enters a site, and map out basic traffic flow.

This early phase relies heavily on pre-design storytelling and simulation. Before diving into rigid CAD grids, designers must build a narrative about how the home will be used.

For example, when planning a renovation in historic Evanston or a modern layout in Lakeshore East, the design team must perform a rigorous site analysis. This involves studying local zoning regulations, wind patterns, and the sun’s path to ensure the design fits harmoniously into its context.

To streamline this transition, professionals use specialized software during the Architectural Schematic Design | Autodesk phase. This software acts as a digital bridge, translating loose, hand-drawn concepts into structured spatial relationships. It allows designers to test spatial scales, evaluate environmental impacts, and establish the overall aesthetic direction before committing to detailed technical drawings.

Essential Software Tools for Modern Architectural Drawing and Design

Choosing the right software depends entirely on the scale of the project, the user’s technical expertise, and whether the goal is quick visualization or deep construction documentation.

  • Revit: Autodesk’s flagship BIM software is the undisputed industry leader for professional-grade architectural design. Revit allows architects to model and document a building simultaneously. When you change a window’s size in a 3D view, every associated floor plan, elevation, section, and schedule updates automatically. This ensures flawless coordination across multidisciplinary teams. Learn more about how professionals leverage these capabilities at Revit for Architecture & Building Design | Autodesk.
  • AutoCAD: The classic standard for precise 2D drafting. While Revit has taken over for complex building design, AutoCAD remains incredibly popular for detailed detailing and quick, flat layout adjustments.
  • Cedreo: A highly accessible, cloud-based 3D home design software tailored for builders and remodelers. Cedreo bypasses the steep learning curve of traditional CAD, allowing users to draw 2D plans and generate photorealistic 3D renderings in a fraction of the time.
  • Draw.archi: An innovative, AI-powered tool that converts hand-drawn sketches into CAD-ready vector files. By recognizing walls, doors, and zones, it applies architectural logic to rough sketches, allowing for rapid design iterations using natural language commands.
  • SmartDraw: Used by over 85% of the Fortune 500, SmartDraw is a versatile diagramming tool that offers easy-to-use templates and extensive symbol libraries. It is perfect for office managers planning commercial layouts or homeowners mapping out simple residential floor plans.
Feature Revit AutoCAD Cedreo SmartDraw
Primary Focus 3D BIM & Documentation 2D/3D Drafting 3D Home Design & Renderings Simple 2D Floor Plans
Learning Curve Steep Moderate to Steep Low Very Low
Automation High (Global updates) Low (Manual updates) High (Auto 3D views) Low (Static templates)
Best For Complex renovations Construction details Client presentations Quick spatial layouts

Anatomy of an Architectural Drawing Set: Types and Conventions

A complete architectural drawing set is a highly coordinated package of information. To the untrained eye, it looks like a confusing maze of lines, symbols, and text. However, it is actually a carefully organized language with over 13 core types of drawings.

Detailed architectural floor plan showing layout, dimensions, and wall types

A standard set typically includes:

  • Site Plans: A high-level view showing the property lines, topography, utilities, and how the building sits on the land.
  • Floor Plans: A horizontal slice cut through the building—conventionally at about 4 feet (1.2 meters) above the floor level—viewed from above, showing room layouts, door swings, and wall thicknesses.
  • Elevations: Flat, 2D views of the building’s exterior or interior walls, labeled by the compass direction they face (e.g., North Elevation).
  • Cross-Sections: A vertical cut-through of the building, revealing the relationships between different floor levels and hidden structural systems.
  • Detail Drawings: Large-scale close-ups (such as 1:10 or 1:5 scale) showing exactly how complex junctions, like a roof-to-wall connection, are physically assembled.
  • Electrical & HVAC Layouts: Diagrams mapping out lighting fixtures, outlets, switches, and ductwork to ensure they do not conflict with structural beams.

Architectural Conventions, Scales, and Standards

To ensure that any licensed builder or plan examiner in Chicago or Evanston can read a drawing set, architects adhere to strict graphic standards and conventions.

  • Paper Sizes: The largest paper size used in modern practice is ISO A0 (841 mm × 1,189 mm) globally, or Arch E (30 in × 42 in) and Large E (36 in × 48 in) in the United States. These large sheets are necessary to display massive amounts of detail clearly.
  • Common Scales: Drawings must be perfectly proportional. Standard scales include 1:100 or 1:50 for floor plans and elevations, and 1:10 or 1:5 for intricate construction details.
  • Line Weights: The thickness of a line communicates depth and material boundaries. Thick lines represent cut objects (like structural walls), medium lines show visible edges (like counter edges), and dashed lines indicate objects above or below the cut plane (like overhead ceiling beams).

Managing these files across a complex project requires rigorous organization. CAD managers and design-build teams rely on structured systems to keep track of every file, view, and sheet. To dive deeper into how these files are structured behind the scenes, read Autodesk’s guide About Concepts of Drawing Management.

How to Read and Interpret Architectural Drawing and Design Sets

Understanding how to read a drawing set is essential for keeping a renovation on track. Drawing sets are generally categorized into three distinct phases:

  1. Presentation Drawings: Highly visual, often rendered in 3D, designed to help clients understand the spatial flow, materials, and overall aesthetic.
  2. Working Drawings: Highly detailed, 2D technical plans used on the construction site. These include precise dimensions, structural notes, and material specifications.
  3. Record (As-Built) Drawings: The final historical record documenting any changes made during construction, capturing the exact “as-built” reality of the finished home.

When reading these sheets, always look for the graphic hierarchy. Labels, room names, and dimensions should be clear and organized. To build your confidence in reading these documents, check out our practical guide on How to Read and Create Building Design Drawings Without Losing Your Mind.

Translating Design Concepts into Buildable Realities

The ultimate purpose of architectural drawing and design is to turn a creative vision into a physical, structurally sound home. This translation requires intense coordination between the architectural plans, structural engineering calculations, and MEP (mechanical, electrical, plumbing) systems.

In professional practice, the design team overlays these different systems on paper or in a shared 3D BIM model before breaking ground. This is where the magic happens: finding out that a massive steel support beam is running directly through a proposed plumbing stack is an easy, zero-dollar fix on a computer screen. If discovered on-site during framing, that same conflict can delay construction for weeks and cost thousands of dollars in structural alterations.

This level of detail is especially critical in local Illinois markets. For instance, projects in the historic North Shore require precise architectural expertise to work with the strict local guidelines. If you are planning a renovation in these areas, partnering with a team that specializes in Highland Park Architectural Drawings Design or Evanston Architectural Drawings Design ensures your plans comply with local municipal building departments and zoning boards from day one.

Improving Drawing Quality and Clarity

Beautiful drawings are not just artistic; they are functional communication tools. To improve the quality and readability of a drawing set, designers focus on several drafting techniques:

  • Visual Hierarchy: Using a distinct contrast in lineweights so structural walls pop off the page, while dimension lines and hatch patterns remain subtle.
  • Smart Use of White Space: Avoiding the temptation to crowd a single sheet with too much information. Leaving clean margins and breathing room around floor plans drastically reduces reading errors.
  • Clear Annotations: Using consistent text styles, clear leader lines, and standard architectural symbols to make notes easy to read at a glance.
  • Strict Graphic Standards: Adhering to universal guidelines so that any general contractor, subcontractor, or municipal inspector can interpret the drawings without confusion.

Frequently Asked Questions about Architectural Drawings

What is the difference between a floor plan and a cross-section?

A floor plan is a horizontal cut through a building, typically taken at 4 feet above the floor level, looking straight down to show the arrangement of rooms, doors, and walls. A cross-section is a vertical cut through the building, as if you sliced it in half with a giant saw, showing the relationships between different floors, ceiling heights, and structural framing layers.

Why do architectural drawings include the note “Do not scale off dimensions”?

Physical paper prints can stretch or shrink slightly due to humidity, and digital copying processes often introduce minor distortions. If a builder uses a physical ruler to measure directly off a printed drawing, they might get an inaccurate measurement. The disclaimer “Do not scale off dimensions” protects the project by forcing the construction crew to rely strictly on the explicit, written numerical dimensions on the sheet.

How do modern 3D renderings compare to traditional 2D blueprints?

Traditional 2D blueprints are highly technical, precise documents essential for permitting, structural engineering, and actual construction. However, they can be incredibly difficult for the average homeowner to visualize in three dimensions. Modern 3D renderings bridge this gap, offering photorealistic visualizations of materials, lighting, and spatial flow, allowing clients to experience their new space before construction even begins.

Architectural Drawings in Chicago

At the end of the day, a successful home renovation relies on clear communication, technical precision, and a seamless transition from initial design to physical construction. Whether you are planning a modern kitchen update in Irving Park or a luxury home addition in Highland Park, having a highly coordinated set of architectural drawings is your roadmap to success.

At Areté Renovators, we specialize in a collaborative, highly structured Design Build Process that brings your ideas to life. Operating as a premier Chicago-based luxury contractor, we manage your entire project under a single contract—from the very first Architectural Drawings Design to the final walkthrough. We work with our Architectural Partners to ensure that there’s no cutting corners on your project.

With a dedicated project coordinator keeping you updated daily, we ensure your design-build journey is smooth, transparent, and beautifully executed. Ready to transform your home? Call us at 773.683.3033 or contact us today to schedule your initial design meeting and bring those architectural drawings to life.

Brick Me Up: The Ultimate Guide to Finding a Tuckpointing Company in Chicago

tuckpointing company chicago

Brick Me Up: The Ultimate Guide to Finding a Tuckpointing Company in Chicago

Why Chicago Buildings Need a Tuckpointing Company — and How to Find the Right One


Finding a reliable tuckpointing company in Chicago is one of the most important decisions you’ll make as a homeowner. Here’s a quick-reference guide to help you get started:

Top things to know when hiring a Chicago tuckpointing company:

  1. Verify licensing — Chicago requires contractors to pass a supervising mason exam. Always ask for their City of Chicago license number.
  2. Confirm insurance — Ask for a Certificate of Insurance before anyone touches your building.
  3. Get a written estimate — Reputable companies provide written quotes within 24–48 hours of an inspection.
  4. Check credentials — Look for BBB ratings, verified reviews, and years of local experience.
  5. Ask about mortar matching — The new mortar must match your existing brick in color, texture, and composition.

Chicago’s brick buildings are tough — but not invincible.

The city’s brutal freeze-thaw cycles do serious damage over time. Water seeps into tiny mortar cracks, freezes in winter, expands, and slowly destroys the joints holding your bricks together. Repeat that hundreds of times over decades, and you’ve got a real structural problem.

That’s exactly why tuckpointing matters so much here. Restoring failing mortar joints protects your building from water infiltration, structural decay, and costly repairs down the road.

One homeowner described getting a quote of $50,000 from one contractor — only to find out after an honest on-site inspection that just two walls actually needed tuckpointing, saving thousands.

That’s the difference the right company makes.

Our professionals will walk you through everything: how to spot mortar failure, what the tuckpointing process looks like, what it costs in 2026, and how to choose a contractor you can actually trust.

How to choose a tuckpointing company in Chicago: steps, signs of damage, cost, and what to look for in a contractor

Easy tuckpointing company chicago glossary:

How to Tell If Your Building Needs a Tuckpointing Company in Chicago

As a property owner in Chicago, Evanston, or Highland Park, keeping an eye on your exterior brick is essential. Mortar joints are designed to be softer than the bricks themselves. This ensures that when your building naturally shifts or expands under the summer sun and shrinks in winter, the mortar absorbs the stress instead of your bricks cracking.

However, because mortar is the sacrificial element of your masonry system, it will inevitably degrade. Routine visual inspections are your first line of defense. Catching deteriorated mortar early prevents moisture from penetrating the building envelope, which can lead to interior water damage, wood rot, and mold growth.

While an annual self-check is highly recommended, scheduling a professional inspection every five years is the gold standard for preventative maintenance. This is especially true for historic properties, such as Chicago’s signature greystones or vintage multi-family buildings. Preserving these historic envelopes requires specialized knowledge of older, delicate materials like lime-rich mortars, making it vital to work with a specialized tuckpointing company in Chicago.

Tuckpointing vs. Repointing: What is the Difference?

While the terms are often used interchangeably by homeowners, masonry professionals distinguish between tuckpointing and repointing based on the aesthetic and structural goals of the project.

  • Repointing is the physical process of removing damaged, crumbling, or deteriorated mortar from the joints of a brick wall and replacing it with fresh, durable mortar. The primary goal here is purely structural—restoring the water-resistant seal and physical stability of the masonry.
  • Tuckpointing takes this restoration a step further. It is an artistic, high-end finishing technique where the mortar joints are filled with a mortar that is custom-colored to match the surrounding brick. Once the joints are filled, a narrow, contrasting line of mortar (usually white or cream, called a “fillet”) is precisely applied down the center of the joint. This creates the visual illusion of perfectly straight, razor-thin mortar joints, which is highly desirable for historic homes with irregular or weathered bricks.

Understanding this distinction helps you communicate your expectations clearly when speaking with a professional. You can read more in our Masonry Tuckpointing guide.

Feature Repointing Tuckpointing
Primary Goal Structural repair and waterproofing Aesthetic enhancement and historic replication
Mortar Color Matched to original mortar joints Matched to the color of the brick itself
Visual Finish Standard joint profiles Two-toned joints with a thin, contrasting “fillet” line
Best Used For General masonry maintenance on standard brick Historic properties, greystones, and irregular brickwork

Visible Signs of Mortar Failure and Climate Impact

Chicago’s climate is notoriously harsh on masonry. Our freezing winters and humid summers create a continuous cycle of thermal expansion and contraction. When water finds its way into hairline cracks in your mortar, it freezes and expands, widening the cracks. Over time, this leads to significant structural failure.

When conducting your own visual inspection, keep an eye out for these key signs of failing mortar:

  • Hairline Cracks: Small, thin fractures running along the mortar joints. While they seem minor, they act as pathways for water to seep deep into the wall.
  • Crumbling Mortar: Mortar that turns to powder or flakes away when you run a finger across it.
  • Spalling Brick: When bricks absorb too much moisture and freeze, their outer faces can crack, peel, or pop off entirely.
  • Chimney Damage: Because chimneys are completely exposed to wind, rain, and snow on all four sides, they typically deteriorate much faster than standard walls. Look for white, powdery salt deposits (efflorescence) or falling mortar on your roofline.

If you notice any of these indicators, it is time to consult a professional. To understand how these issues can escalate, check out our Masonry Repair Tag archive.

crumbling mortar joints showing signs of water damage

The Professional Tuckpointing Process and Cost Breakdown

A proper tuckpointing job is not a quick weekend DIY project. It is a highly technical, multi-step process that requires precision, specialized tools, and a deep understanding of structural chemistry. Taking shortcuts to save on upfront costs often leads to premature joint failure and much higher expenses down the road.

Step-by-Step Process Followed by a Tuckpointing Company in Chicago

When we manage a masonry restoration project, we follow a rigorous, time-tested process to ensure structural integrity and a flawless finish:

  1. Grinding the Joints: Professional masons use specialized diamond-blade grinders to remove the damaged mortar. The industry standard is to grind the old mortar to a depth equal to exactly two times the width of the joint to ensure a proper mechanical bond for the new material.
  2. Dust Containment and Prep: Grinding brick creates a massive amount of dust. Professional crews use vacuum-shrouded grinders and wet-cutting techniques to minimize dust migration, protecting your property and your neighbors.
  3. Mortar Mixing: Matching the physical composition of the original mortar is critical. For historic Chicago homes built before the mid-20th century, we use custom-mixed, lime-based mortars. Using modern, rigid Portland cement on historic, soft bricks will cause the bricks to crack and spall.
  4. Applying Mortar in Lifts: Rather than filling the joint all at once, the new mortar is applied in two to three thin layers (lifts). This prevents shrinkage cracks and ensures a dense, watertight seal.
  5. Joint Tooling: Once the mortar is semi-dry, the joints are tooled to match the historic profile of the building, shedding water away from the wall.
  6. Cleanup: The brickwork is washed to remove any excess mortar residue, leaving a clean, beautiful facade.

To learn more about how we manage these projects from start to finish, explore the Masonry and Tuckpointing services we offer.

Step by step process of professional masonry tuckpointing: grinding, mixing, applying, tooling, cleanup

Chicago Tuckpointing Cost and Timeline Expectations

Tuckpointing costs in the Chicagoland area vary widely depending on the scale of the project, accessibility, and the architectural style of your home.

For standard residential properties, a typical tuckpointing project can take anywhere from a few days to a week. However, historic Chicago greystone renovations represent a more significant investment. A full exterior masonry restoration—including selective tuckpointing, limestone repair, and chemical cleaning—typically ranges from $15,000 to $50,000. For landmark properties or complex commercial structures, costs can range from $30,000 to $150,000.

If you are undertaking a larger remodeling project, keep in mind that a full gut renovation of a historic 2,500 to 3,500 square foot greystone home in Chicago typically averages between $250,000 and $600,000 (roughly $150 to $400 per square foot), which often includes structural masonry stabilization as a top priority.

How to Choose the Best Contractor for Chicago Masonry

Selecting a qualified tuckpointing company in Chicago requires careful vetting. Because masonry is structural, hiring an unlicensed or inexperienced contractor can lead to catastrophic damage to your home’s exterior.

Finding a Tuckpointing Company in Chicago for Specialty Masonry Services

When evaluating contractors, look for companies that offer a comprehensive suite of specialty masonry services. A home’s exterior is an interconnected system, and a true masonry expert should be able to address all related components:

  • Chimney Repair & Rebuilds: Your chimney is highly vulnerable to the elements. Masons should offer video chimney scans to inspect the interior flue liner for hidden cracks before performing exterior tuckpointing.
  • Lintel Replacement: Steel lintels (the angle irons above your windows and doors) support the brickwork above openings. As they age and rust, they expand—a process called “jacking”—which cracks and shifts the surrounding masonry. They must be replaced and properly flashed.
  • Parapet Wall Repair: The top sections of your exterior walls extending above the roofline require careful maintenance, waterproof coping stones, and proper tuckpointing to prevent water from entering the building envelope.

If you need professional assistance with these specialized systems, check out our Expert Chicago tuckpointing services page.

What to Look For in a Licensed and Insured Contractor

To protect your home and your investment, always verify the following credentials before signing a contract:

  1. City Licensing: The City of Chicago requires masonry contractors to pass a rigorous “supervising mason” licensing exam. Never hire a contractor who cannot provide their active Chicago license number.
  2. Comprehensive Insurance: Ensure the company is fully bonded and carries both general liability and workers’ compensation insurance. Request a Certificate of Insurance (COI) directly from their insurance agent.
  3. Written Estimates: A reputable contractor will provide a detailed, written estimate outlining the specific scope of work, material specifications, permanent solutions, and cleanup procedures within 24 to 48 hours of an on-site visit.
  4. Reputation and Ratings: Look for companies with high BBB ratings, a strong local presence, and verified customer reviews.

restored historic brick facade after tuckpointing

For a deeper dive into vetting local contractors, read our comprehensive Guide to choosing tuckpointing contractors in Chicago.

Frequently Asked Questions about Chicago Tuckpointing

How often should I inspect my Chicago masonry for damage?

We recommend that Chicago homeowners perform a basic visual check of their brickwork every year, specifically in the spring to spot any damage caused by the winter freeze-thaw cycles. A professional, detailed masonry inspection should be scheduled every five years to catch hairline cracks and minor mortar erosion before they turn into expensive structural repairs.

Can tuckpointing help resolve city masonry violations?

Yes. If you have received a building department citation or a masonry violation from the City of Chicago, hiring a licensed and insured tuckpointing contractor is the only way to resolve it. A professional contractor who understands local building codes can perform compliant repairs, handle the permit process, and provide the official documentation required to satisfy city inspectors.

Chicago Tuckpointing Services You Can Trust

Your home’s brick facade is its first line of defense against Chicago’s demanding climate. Investing in professional tuckpointing preserves your property’s structural integrity, prevents water infiltration, and enhances its historic beauty.

At Areté Renovators, we are proud to serve homeowners in Chicago, Evanston, and Highland Park. We specialize in high-end residential remodeling and historic renovations, bringing a highly structured, client-focused process to every project. From our initial design consultation to the final walkthrough, our dedicated project coordinators provide daily updates to ensure your project runs smoothly and is completed to the highest standards.

Ready to protect and restore your historic home? Schedule an initial meeting to discuss your masonry and tuckpointing project with our expert team today.

How to Survive Your Next Bath Remodeling in Chicago

chicago luxury bathroom renovation

How to Survive Your Next Bath Remodeling in Chicago

What You Need to Know Before Starting a Chicago Bathroom Renovation


A Chicago bathroom renovation is one of the most rewarding — and most complex — home improvement projects you can take on. Costs run anywhere between $12,000 and $85,000+, timelines range from 2 to 5 weeks, and the city’s unique mix of vintage housing stock, strict building codes, and condo HOA rules adds layers most homeowners don’t see coming.

Here’s a quick overview of what to expect when working with Areté:

Category Project Type / Tier Start Pricing Design Timeline Build Timeline Total Timeline
Bathroom Powder Room $25K 1-2 weeks 4-5 weeks 4-7 weeks
Bathroom Guest Bath $50K 3-4 weeks 6-8 weeks 9-12 weeks
Primary Bath Tub / Shower Combo $45K 4-6 weeks 8-12 weeks 12-16 weeks
Primary Bath Double Vanity + Walk-In Shower $55K 4-6 weeks 8-12 weeks 12-18 weeks
Primary Bath Separate Tub + Shower $65K 4-6 weeks 10-15 weeks 14-21 weeks
Primary Bath Larger Separate Tub + Shower $85K 4-6 weeks 10-14 weeks 14-20 weeks

About 70% of Chicago’s residential buildings were built before 1970. That means behind almost every dated bathroom wall, there’s a real chance of finding galvanized pipes, knob-and-tube wiring, or water-damaged subfloors waiting to surprise you — and your budget.

Our team can walk you through every stage of the process: planning, budgeting, permits, design, and contractor selection. Whether you’re in a vintage Wicker Park bungalow or a Streeterville high-rise, you’ll know exactly what to expect and how to stay in control.

Planning Your Chicago Bathroom Renovation: Gut vs. Cosmetic

Before you pick out single-handle brass faucets or start dreaming of a deep soaking tub, you must define the scope of your project. This is the fork in the road where your budget, timeline, and daily sanity will be decided.

A cosmetic refresh is a surface-level facelift. It is ideal if your bathroom’s layout works perfectly and the underlying infrastructure is sound. In a cosmetic update, you might replace the vanity, swap out old lighting fixtures, install a new toilet, and put down fresh floor tile. Because you are not opening up walls or moving plumbing lines, these projects are fast, highly affordable, and rarely require city permits.

A full gut renovation, on the other hand, involves stripping the room down to the bare wall studs and subfloor. This is highly recommended for vintage Chicago homes where old infrastructure is past its prime. A gut renovation is necessary if you plan to execute layout changes — such as relocating the toilet, moving the sink vanity, or converting a bulky bathtub into a sleek walk-in shower.

When deciding which path to take, ask yourself: Is the current layout functional? Are there signs of water damage? Am I trying to solve layout headaches or just aesthetic ones? Answering these questions early will help you figure out What to Consider Before Starting a Bathroom Remodel in Chicago so you can set realistic expectations.

Step-by-Step Timeline for a Chicago Bathroom Renovation

A standard bathroom remodel in Chicago typically takes 2 to 4 weeks of active construction, but the entire process — including design and planning — spans a bit longer.

Luxury Chicago bathroom design with a window view of the cityscape directly over the bathtub.

Here is how the typical step-by-step renovation workflow breaks down:

  1. Design & Planning (1 to 3 Weeks): You work with designers to choose layouts, select finishes, and order materials. Sourcing items early prevents mid-project delays.
  2. Permits & HOA Approvals (1 to 2 Weeks): If you are doing structural, electrical, or plumbing work, your contractor will pull the necessary city permits and coordinate with your condo board.
  3. Demolition & Prep (2 to 3 Days): The old space is dismantled. Debris is hauled away, and the room is stripped down to the studs.
  4. Rough-In Plumbing & Electrical (3 to 5 Days): Licensed plumbers and electricians run new lines, update old wiring, and position valves.
  5. Inspections (1 to 2 Days): City inspectors verify that rough-ins meet strict Chicago building codes.
  6. Waterproofing & Drywall (2 to 3 Days): Moisture-resistant backer boards and advanced waterproofing membranes are installed in wet areas.
  7. Tiling & Flooring (4 to 7 Days): Tiles are laid, grouted, and sealed.
  8. Fixture & Trim Installation (2 to 3 Days): The vanity, toilet, shower glass, faucets, and light fixtures are installed.
  9. Final Inspection & Walkthrough (1 to 2 Days): The final city sign-off is completed, and we do a final punch-list review with you.

Understanding this sequence helps you plan your daily routine and manage expectations regarding How Long Does a Bathroom Renovation Last in real-world scenarios.

Choosing Between a Wet Room and Traditional Layout

If you are planning a gut remodel, layout choice is your biggest design decision. Traditional bathrooms feature distinct zones: a dry floor area, a separate vanity, and a framed tub or shower stall.

However, many modern Chicagoans are opting for a wet room design. In a wet room, the entire bathroom (or a large, barrier-free section of it) is fully waterproofed and tiled. The shower is curbless, allowing water to drain directly through a sloped floor.

A wet room is an incredible space-saver for tight condo layouts, making small footprints feel expansive and luxurious. To weigh the aesthetic and practical differences for your home, explore the benefits of A Wet Room vs Traditional Bathroom in Chicago before finalizing your architectural plans.

The Real Cost of Remodeling in the Windy City

Budgeting realistically for a chicago bathroom renovation in 2026 means understanding local labor rates and material costs. Labor typically accounts for 40% to 50% of your total project costs. This is driven by Chicago’s mature construction market, where highly skilled, licensed tradespeople are required to ensure work is safe and durable. Licensed plumbers in Chicago typically charge $85 to $150 per hour, while licensed electricians run $75 to $130 per hour.

Because labor and structural elements make up such a large portion of the bill, it helps to understand What’s the Priciest Part of a Bathroom Remodel so you can allocate your funds strategically without cutting corners on waterproofing or professional installation.

Hidden Costs in a Vintage Chicago Bathroom Renovation

If your home was built before 1970, your walls are likely hiding secrets. When we open up plaster and lath in historic Chicago bungalows or two-flats, we frequently run into outdated infrastructure that must be updated to meet modern safety codes.

  • Outdated Galvanized Pipes: These old steel pipes corrode from the inside out, restricting water pressure and eventually leaking. Replacing them with modern copper or PEX is a common necessity.
  • Knob-and-Tube or Ungrounded Wiring: Old electrical systems cannot safely handle modern high-draw appliances like hair dryers, let alone luxury additions like heated floors.
  • Subfloor Water Damage: Slow, hidden leaks around old cast-iron tubs often rot the wooden subfloor over several decades, requiring structural joist repairs before new tile can be laid.
  • Asbestos or Lead Paint: Older plaster or pipe insulation may require professional abatement.

To keep your project on track, we always recommend setting aside a 10% to 15% contingency budget to handle these surprises. Read up on What to Know Before Renovating an Old Chicago Bathroom and learn How to Handle Unexpected Challenges During a Chicago Bathroom Remodel so you can navigate the demolition phase with confidence.

ROI and Resale Value

While a remodel certainly improves your daily quality of life, it is also a highly strategic financial investment. In the Chicago real estate market, homeowners typically recover 60% to 80% of their bathroom renovation investment when they sell their home.

If you are looking to maximize resale appeal, design trends point heavily toward bright, airy spaces. A classic white or neutral bathroom featuring a spacious walk-in shower can add up to 93% of its renovation cost back to your home’s value. Modern buyers value large, low-maintenance showers over oversized garden tubs, making tub-to-shower conversions one of the smartest upgrades you can make.

Chicago has some of the strictest building codes in the country. The City of Chicago Department of Buildings requires permits for any project that alters plumbing systems, electrical wiring, or structural walls.

To pull these permits, you must work with a licensed, bonded, and insured general contractor. Attempting to bypass the permit process is highly risky; unpermitted work can lead to heavy city fines, force you to tear out finished tile for inspections, and create major headaches when you eventually try to sell your home.

At Areté, we handle all permitting for you and take the pain out of the process.

HOA and Condo Association Rules

If you live in a high-rise or a multi-family condo building in neighborhoods like Lakeshore East or the Loop, you have another layer of authority to coordinate with: your Homeowners Association (HOA). Condo renovations typically cost 15% to 20% more than single-family homes due to the logistical challenges of high-rise construction.

Before work begins, you must secure an alteration agreement from your condo board. Your building will likely enforce strict rules, including:

  • Restricted Working Hours: Many buildings only allow construction noise between 9:00 AM and 4:00 PM on weekdays.
  • Freight Elevator Reservations: Contractors must book elevator times in advance, which can cost $500 to $1,200 in building fees.
  • Strict Insurance Requirements: Your contractor must provide certificates of insurance (COI) often showing $2M+ in liability coverage.
  • Water Shutoff Windows: Plumbing tie-ins must be scheduled with building management to notify neighbors of temporary water shutoffs.

When designing for a condo, space and plumbing constraints are key. Check out our guide on choosing a Wet Room vs Walk In Shower for a Chicago Condo Bathroom to find the best fit for your building’s rules. While some homeowners look at quick-update options for simple wet-area liners, a custom design-build approach ensures full compliance with local high-rise construction standards.

Chicago’s historic homes and compact urban condos require smart design to balance luxury and utility. In 2026, the focus is on creating serene, spa-like spaces, regardless of the room’s square footage.

Popular design trends in Chicago focus on natural textures and soothing color palettes. We are seeing a shift away from cold, clinical all-white bathrooms toward warm wood tones, textured vertical tiles, and earthy colors like sage green and terracotta.

If you are working with a tight footprint, you can Transform Your Small Chicago Bathroom with These Brilliant Shower Ideas to make the room feel twice its size.

Smart Storage and Layouts for Vintage Homes

Vintage Chicago homes often feature narrow bathroom layouts that lack built-in closets. To keep your countertops clutter-free, you have to get creative with storage.

  • Wall-Mounted Vanities: Floating vanities expose more floor space, which tricks the eye into making a small room feel larger while providing clean drawer storage.
  • Built-In Wall Niches: Sinking storage shelves directly into the wall framing between studs is a fantastic way to store toiletries in the shower or next to the vanity without taking up physical room.
  • Custom Medicine Cabinets: Recessed medicine cabinets with mirrored doors offer sleek, hidden storage right at eye level.

For tailored ideas that fit your specific layout, explore Custom Storage Solutions for Your Small Chicago Bathroom to maximize every square inch.

Modern Materials and Winter Preparation

Chicago’s extreme seasonal shifts — from humid, hot summers to freezing, dry winters — mean your bathroom materials have to be incredibly resilient.

To prevent drafty, cold mornings, many Chicagoans are installing radiant floor heating. Before committing, it is wise to weigh The Pros and Cons of Heated Floors in Chicago Bathrooms to see if they fit your budget and lifestyle.

Additionally, you must ensure your plumbing is protected from freezing temperatures. Proper insulation of exterior walls and selecting high-quality, moisture-resistant porcelain tiles are key steps in learning How to Prepare Your Bathroom for Chicago’s Harsh Winters.

Frequently Asked Questions About Chicago Bathroom Remodeling

Can I live in my home during a bathroom remodel?

Yes, you can live in your home, but it requires some planning. If you are renovating your only bathroom, you will need to arrange temporary showering facilities or stay elsewhere during the active construction phase.

We can help you arrange temporary living during your remodeling process. Our sister company, Areté Property Development, can assist with any relocation needs while we build your dream space.

If you have a second bathroom, living at home is completely feasible. A professional remodeling crew will implement strict dust control measures, including heavy plastic floor protection and zip-wall barriers, to keep construction debris isolated to the work area.

Is it better to remodel a bathroom in the summer or winter in Chicago?

Both seasons have distinct advantages. Summer is incredibly popular because it allows for easy ventilation during painting and tiling.

However, scheduling your remodel during the winter months (December to February) can be highly advantageous. Because contractor demand is lower during the winter, you may secure shorter wait times and even benefit from seasonal contractor rate discounts of 10% to 15%.

Do cosmetic bathroom updates require a permit in Chicago?

No. Simple cosmetic updates — such as replacing an existing vanity in the same location, swapping out light fixtures without running new wiring, painting, or replacing flooring — do not require a permit from the Chicago Department of Buildings. Permits are only triggered when you open up walls to alter plumbing, run new electrical circuits, or change the structural layout of the room.

Conclusion

A successful chicago bathroom renovation relies on careful planning, realistic budgeting, and hiring the right professional team to bring your vision to life. We are well-versed with the unique challenges of Chicago’s historic architecture, strict city codes, and condo association rules. It is much easier when you work with an experienced local partner.

At Areté Renovators, we specialize in helping homeowners throughout Chicago, Evanston, and Highland Park transform their bathrooms into beautiful, functional spaces. Our highly structured, client-focused process takes the stress out of remodeling. With a dedicated project coordinator managing your schedule and providing daily updates, you are never left guessing about the status of your project.

Ready to design your dream bathroom? Start Your Chicago Bathroom Remodeling Project with us today and let us handle the details from design through final walkthrough.